Resin Coffee Table – Make Your Own Wood and Epoxy Showpiece
This post may contain affiliate links. We may earn a small commission from purchases made through them, at no additional cost to you. You help to support resin-expert.com
If you have never seen a resin coffee table, you are in for a treat! Quite possibly the most beautiful trend when it comes to tables of all kinds, these stunning and unique tables crafted from wood and epoxy resin have become extremely popular over the years. Of course, they fetch quite a hefty price tag in stores, but did you know that it is possible to make one of these gorgeous tables yourself? Keep reading to learn how to make a resin coffee table for your home with our easy-to-follow DIY resin coffee table guide!
Skills Needed to Build a Resin and Wood Coffee Table
A project on this scale requires skill, so this is not for beginners. You should already have some experience working with epoxy resin and also have some skill and experience with woodwork before you try to take on a large project such as building your own DIY resin coffee table. This is also not a cheap project by any means, so if you have no prior experience but still wish to learn how to make a resin coffee table, we suggest asking a friend or professional for assistance. If you are lucky, you will find wood at a salvage yard, but if you are unable to find the perfect slab or log of wood, you may need to spend a little more. Epoxy resin is also an expensive material, and you will be needing quite a bit for a project this size. So, if you have the experience required working with resin, wood, saws, and a sander, keep reading to learn how to make a resin coffee table!
The Required Supplies
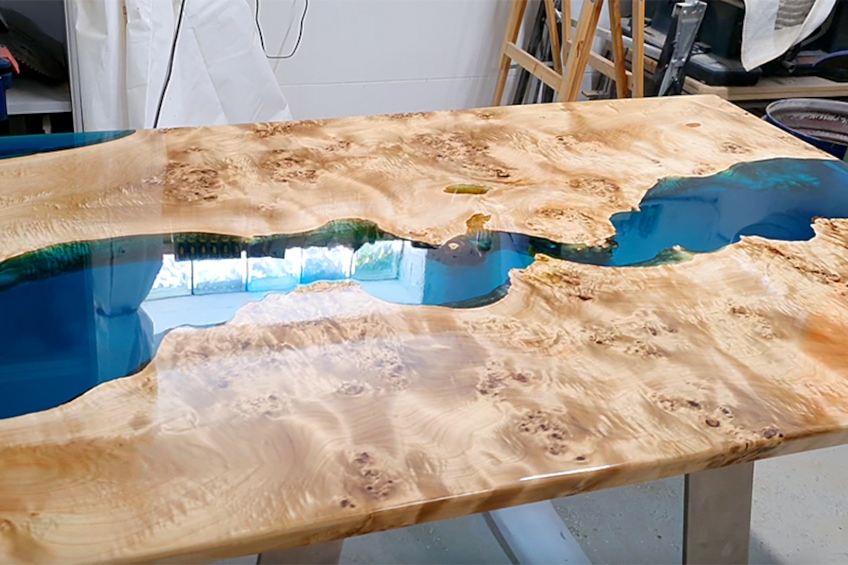
As with any project, gathering the right supplies is the first step. You will need some wood of course, and for this project older wood with character is preferred. In our tutorial, we use burl poplar planks. This is because burl poplar has a lovely grain and is full of knots and character. You can use absolutely any wood you wish, however, the wood you select should be dry and have a moisture level between seven and ten percent. Should you use a wood that is too moist, you will have problems with shrinkage, which will undoubtedly cause issues in the future. You will also have to decide how thick your resin and wood coffee table will be and if you prefer a natural-looking live edge resin coffee table, or something sleeker and more modern with straight edges instead. For our tutorial, you can see we chose the former.
You will also need a dye color for your resin, and trust us, there are so many to pick from! Blue is quite often a popular choice, but you can use any color you like! If the wood you are using is a light color, almost any color epoxy will look lovely. Should you be using a darker wood, such as walnut, you have fewer colors to pick from as you do not want the wood and resin to look washed out.
Safety First
When you work with epoxy resin, you need to follow each and every safety instruction carefully. Liquid epoxy is toxic and needs to be handled with care. Make sure you use proper safety gloves and of course, a pair of safety glasses, as well as a respirator of high quality. You want to avoid all possible direct contact with the resin, and that includes inhaling it. Once dried, and you begin sanding and polishing, you will still need to use your safety equipment, as you do not want to inhale any of the epoxy resin sanding dust.
Step-by-Step Instructions on How to Make a Resin Coffee Table
Once all your supplies are at hand and safety equipment as well as tools are ready, you can begin building your resin coffee table, let us show you how!
Step 1: Measuring and Laying out the Wood
The very first step in building a live edge resin coffee table is to lay out your planks of wood and measure them. You can put the planks in different directions or try various combinations until you are happy with the layout. Use your imagination during this process and think out of the box! Once you have a shape you are happy with, you can use your straightedge to draw right angles onto the wooden planks where you will be sawing them.
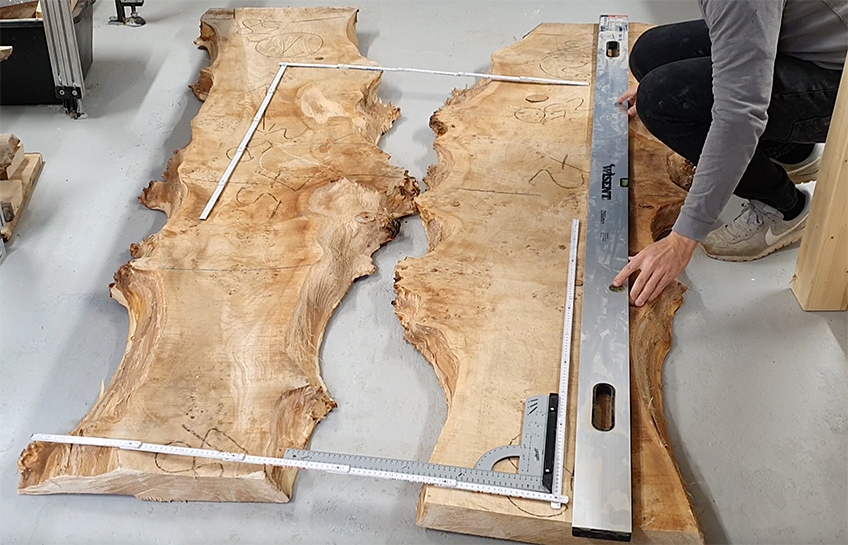
Remember that your measurements need to be perfectly exact and precise. It is a good idea to plan for some reserve – around two centimeters in width and four centimeters in length is usually an ideal guideline for this.
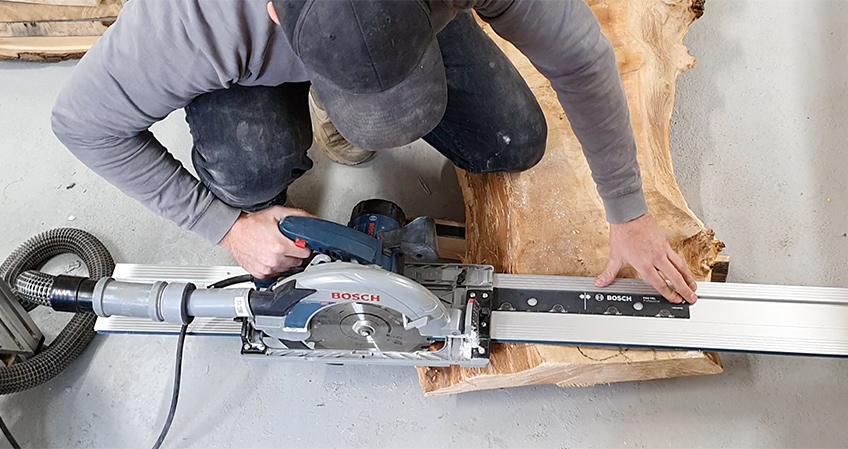
Step 2: Cutting the Planks to Size
Now you will use a circular saw in order to cut your wood the correct size. Following the marks you created in step one, cut your plank ends so that they are straight but also level. This is a very important step in creating your DIY resin coffee table, as it will determine the final result of your table. Take as long as you need to make sure it is perfect. Again, do not forget to wear the correct safety gear while using machinery such as the circular saw.
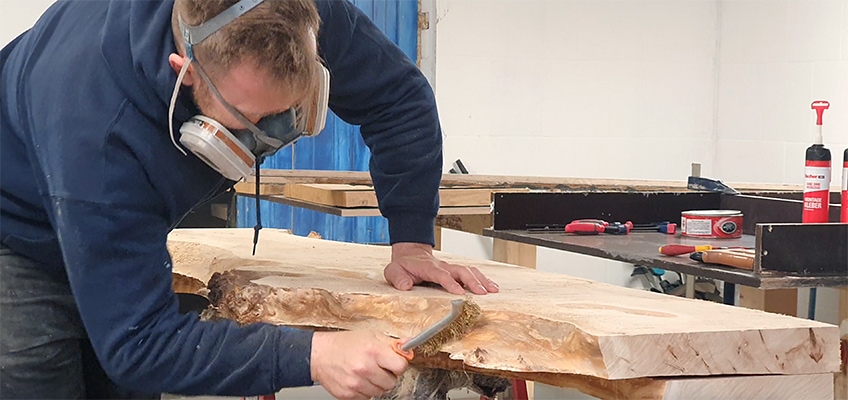
Step 3: Cleaning the Wood
Now is the time to smooth your planks and level them. If you are using raw wood, you will notice stress cracks within the wood as well as warping. In this step, you have to make sure both your chosen planks are the same thickness throughout, otherwise, they will not lay flat in the mold. Once all has been planned, you can sand the wood down until it is nice and smooth.

If you wish to keep a live edge on the wood, use some steel wool or a wire brush to clean it up and get rid of any loose bark or dirt, do not skip this part because this is where your resin will connect each plank, so if there is any dirt or dust, it could negatively impact how well the resin bonds to the planks.
Step 4: Creating a Resin Mold
Now you need to build a mold for your DIY resin coffee table. This is what will determine the end result and shape of your table. The mold you build needs to hold the wooden planks in place to allow the resin to set and cure. Silk-screen plates work very well to construct a mold as they are smooth and waterproof, making them ideal for resin casting. You should also use a release wax on all the mold sides and then screw them together. Fischer’s assembly adhesive will also be beneficial to help prevent any resin from leaking out.
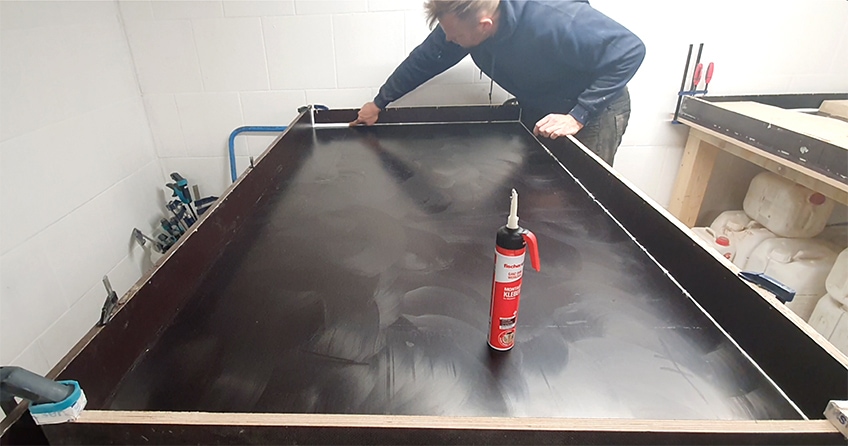
When your mold is ready, carefully place your wooden planks inside. Make sure they align perfectly and if needed, sand any edges that might need it. Once aligned perfectly, use some glue clamps and beams to fix them into place. This will prevent them from floating or moving once you have poured the epoxy.

Step 5: Preparing the Resin
You should now have a mold at the ready, as well as clean and smooth wood. It is time for the fun part – mixing your epoxy resin! How much resin you will need for your coffee table will depend entirely on the table size, this can be tricky to calculate, but using a resin calculator is useful, and you should be able to find a resin calculator tool online if needed.
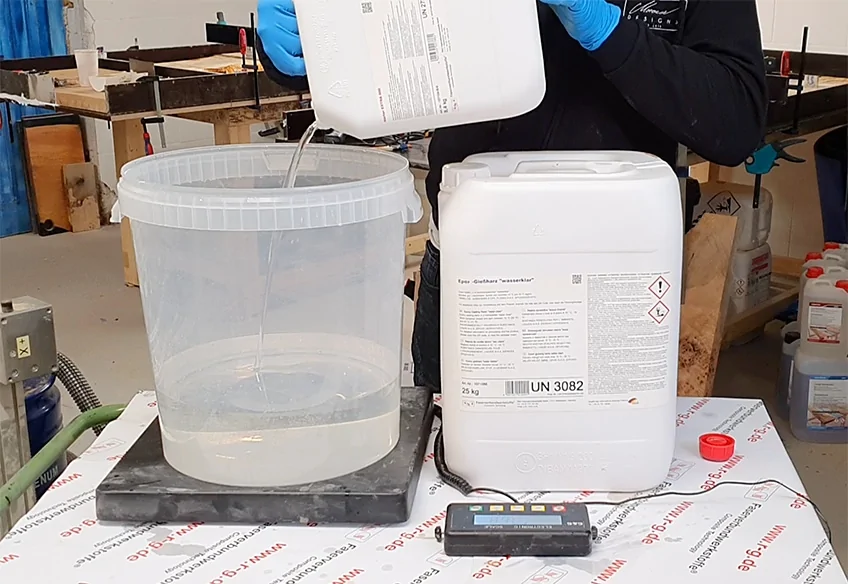
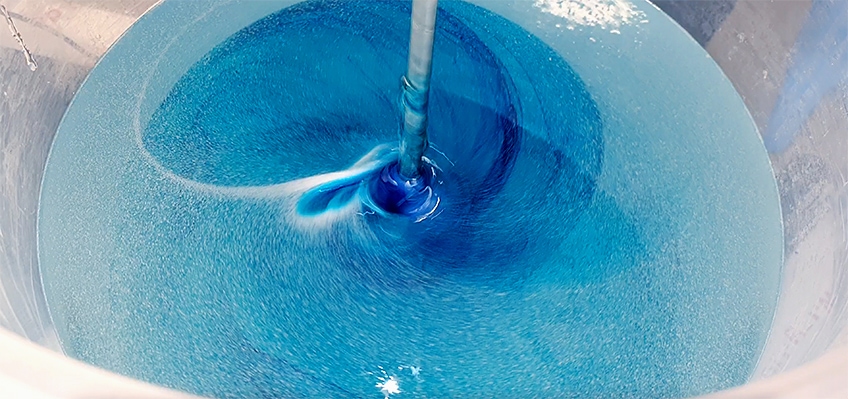
Now that you have determined how much resin is needed for your coffee table, you will weigh the correct proportions of epoxy and hardener. Then, mix both components together in another large pot and stir. You can now add color to the resin, and as mentioned before, there are tons of color choices to choose from! For the purpose of our resin and wood coffee table, we are using a blue color. Be sure to mix the dye in well and slowly. You will notice bubbles inside your resin, usually, these bubbles will float up to the surface, and you are able to pop them after 30 minutes.
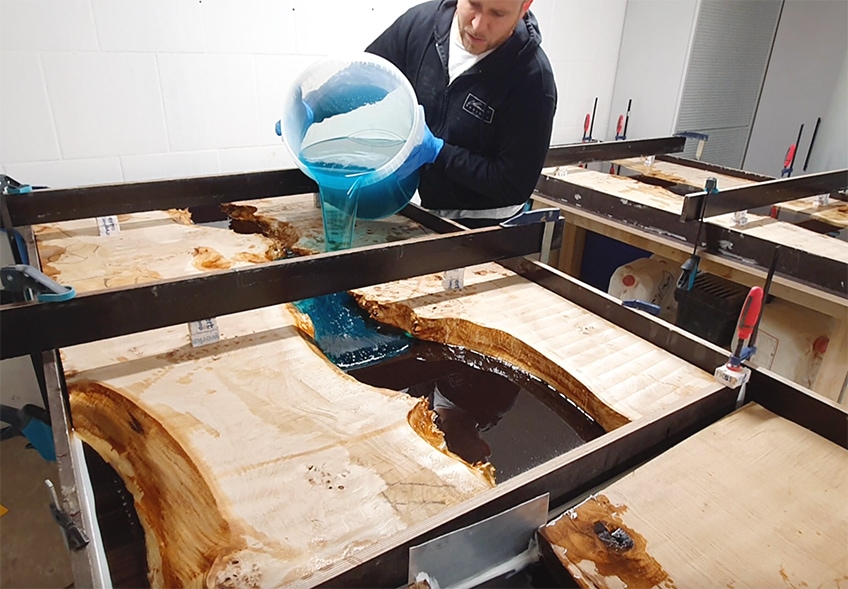
Step 6: Casting Your DIY Resin Table Top
This step is probably the most exciting part, as we will now pour the resin into our mold. You need to be careful as you pour and not aerate it too much, this is to avoid excessive bubbles. After about 30 minutes, you should notice the bubbles that did form, have risen to the surface. You can now pop them. If you are struggling to get rid of them all, a hairdryer on the lowest setting moving swiftly can help bring any stubborn bubbles up to the surface. Because this is a table and quite thick, you may need to wait up to seven days for the resin to cure entirely.
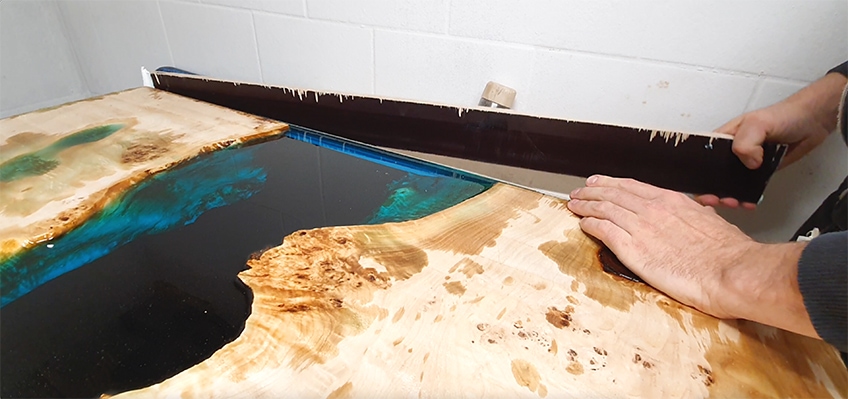
Step 7: Cutting, Shaping, and Milling Your Resin and Wood Coffee Table
Now that the resin has cured, you can unscrew and release your mold. Use a rubber mallet to help separate each mold edge from the table. You can now mill the table until smooth and flat.
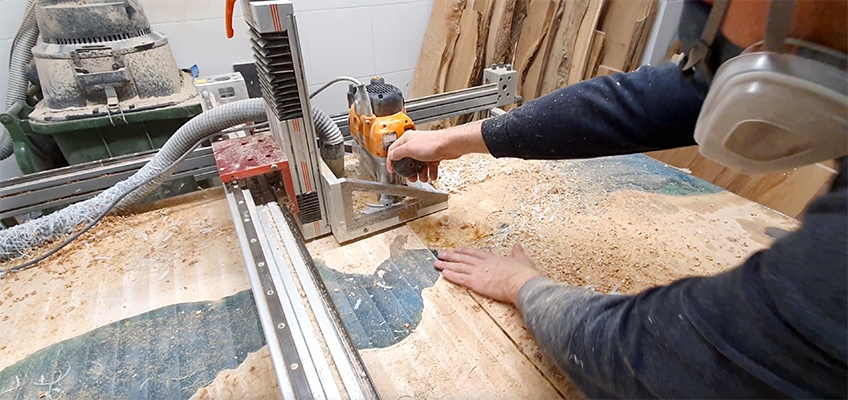
It is now time to plane and saw the resin and wood coffee table to its final size and shape. For this step, you should use a hand-held circular saw. Remember to wear safety goggles and a mask so that you do not inhale any of the cured resin. You can now also fill any cracks or holes in the wood now. Lastly, use a router and round any edges of the table.
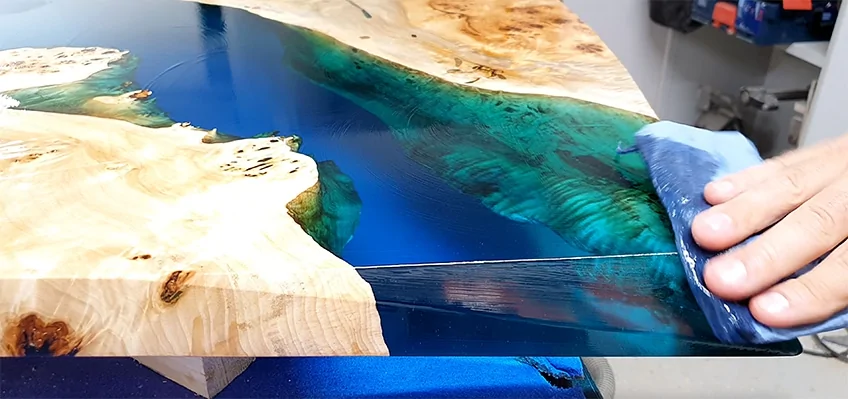
Step 8: Sanding and Polishing Your Live Edge Resin Coffee Table
Use an orbital sander to sand both the wood and resin of the table. You will need a few different grits, namely 80, 100, 120, 150, 180, and 240. After each sand, make sure you dust your workpiece off.
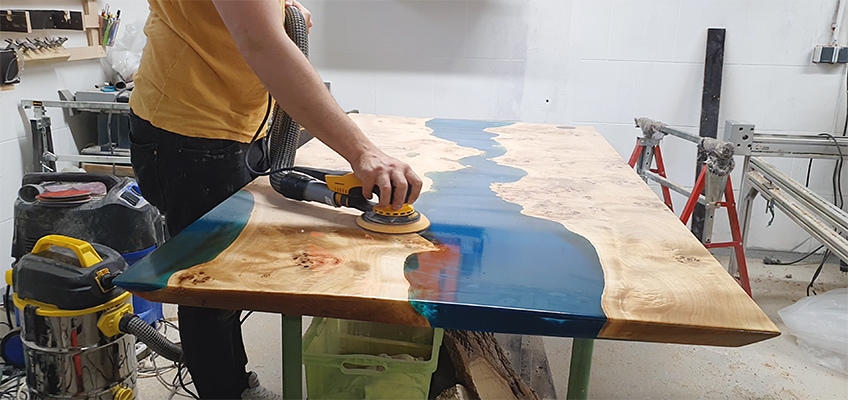
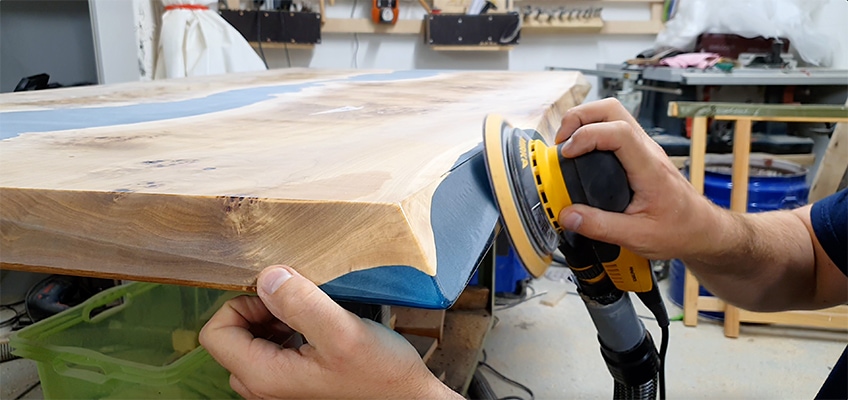
Now that the top of your DIY resin coffee table has been sanded, you can begin sanding the sides. Make sure you use the same progression of low to high grit sandpaper. This will help to make sure your edging is clean and smooth. It is important to make sure there is no lip between the resin and the wood.
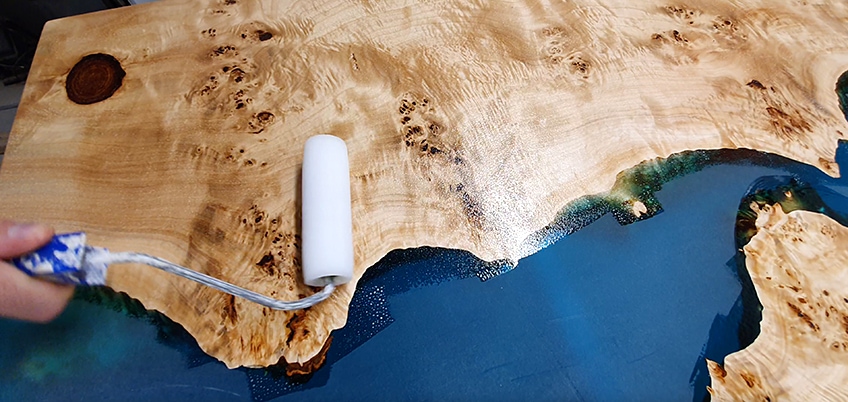
Now that your resin and wood are all nicely sanded, you need to seal your table. This is achieved by applying a very thin layer of resin onto the table. Once dried and cured, you will yet again sand the table. This time using a progression of grit paper in sizes 360, 600, 1000, 2000, and 3000. This is to help prepare the wood and resin to be polished. Remember to work thoroughly and evenly. You will need to complete each sanding to polishing around five times. Again, dust the workpiece off after each sanding.
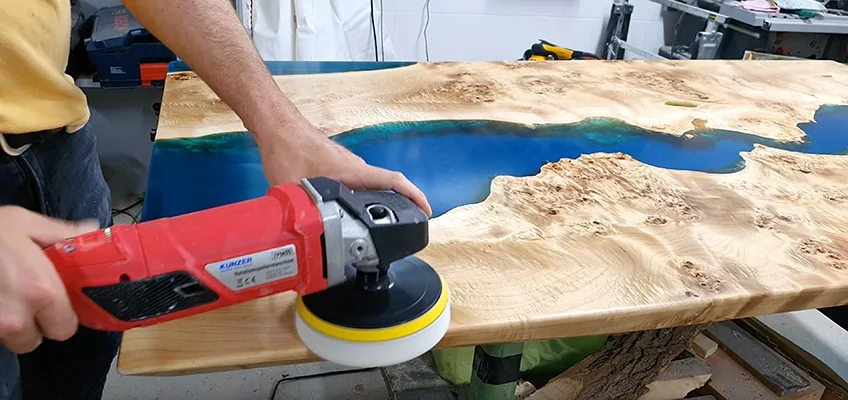
Step 9: Polishing the Top of Your DIY Resin Coffee Table
This is the last step for the tabletop, it will create the luster to your table. Do not set your polisher’s speed too high, as a high rotation will cause the resin to warm up and this can cause ugly spotting. Work in a swift and smooth motion.
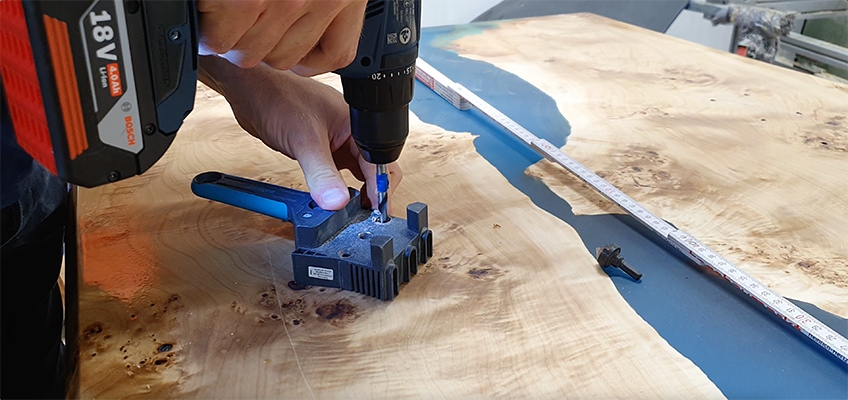
Step 10: Adding the Legs to Your Live Edge Resin Coffee Table
Now that your table’s top is complete, you can add the table legs! It is easiest to purchase some screw-in threaded sockets which then secure to the table-top and allow you to simply screw the table legs on. You can use any legs you fancy, and most hardware stores will have a wide range of options available to you. Usually, because the table-top itself is quite eye-catching, it is best to use plain legs. This is of course entirely your choice.
After so much hard work creating your DIY resin coffee table, we bet all you want is a nice hot cup of coffee and to admire your creation! Have a seat and marvel at the beautiful table you have created, and congratulate yourself for a job well done!
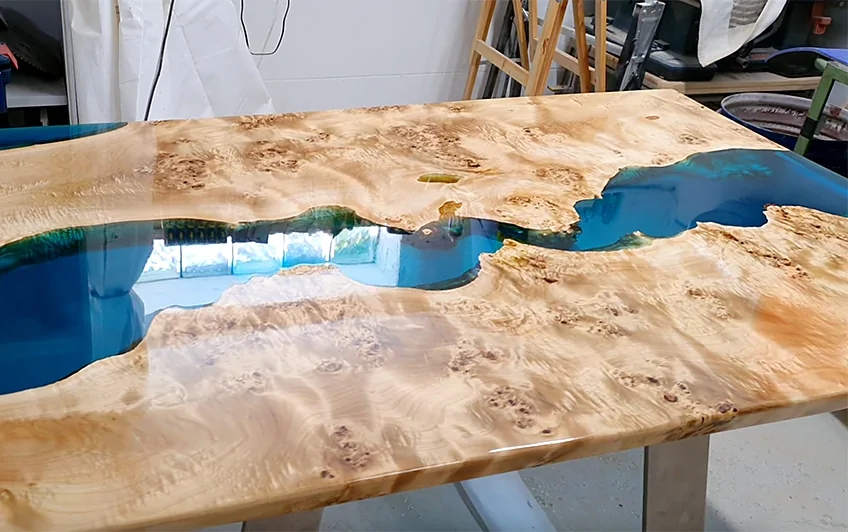
Well done on creating and building your very own resin and wood coffee table! A DIY project of this size and complexity is tough, so, congratulations! We are sure that any visitors will instantly fall in love with your beautiful table the moment they see it!
Frequently Asked Questions
How Much Skill is Needed to Build a Resin Coffee Table?
Building a DIY resin coffee table will require intermediate skills, especially with previous epoxy resin and woodworking experience. Both of these skills are demanding and not as simple as they sound, so be sure you are aware of the work that is involved.
Can I Make My DIY Resin Coffee Table Any Color?
Yes! There are so many resin dyes you can choose from! Remember, however, that the color of the wood used for your live edge resin coffee table plays a role in the resin color choice. For example, if you have used redwood, you probably do not want to use a red resin dye. Generally, blues and greens make the best color choices for resin coffee tables.
