Epoxy Casting Resin – The Ultimate Guide for Resin Casting
This post may contain affiliate links. We may earn a small commission from purchases made through them, at no additional cost to you. You help to support resin-expert.com
Casting resins are specially developed epoxy resins, which are designed for casting molds, figures, jewellery and some other applications. We show you where a casting resin should be used and what to consider when buying a casting resin.
Table of Contents
What is Casting Resin?
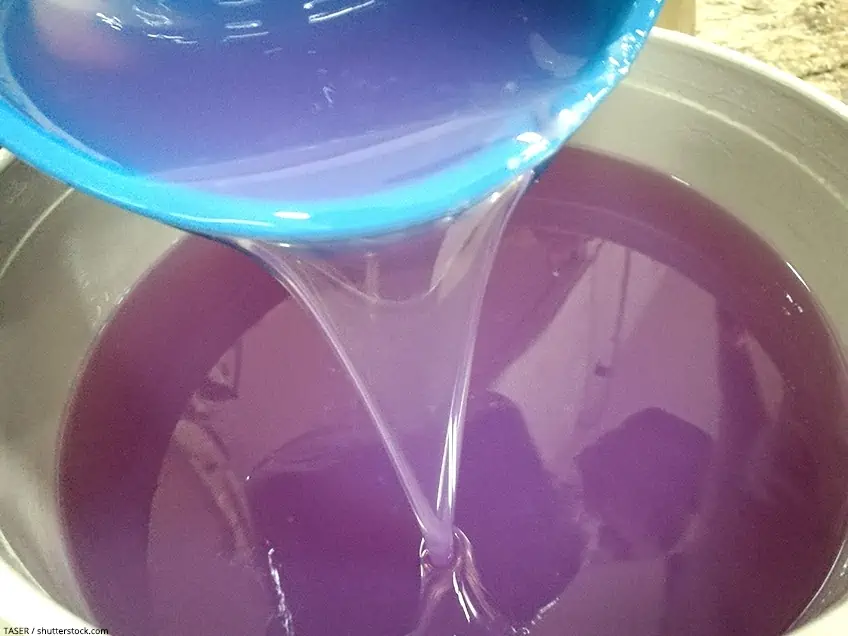
Casting resin is a low-viscosity epoxy resin, which consists of two components: the actual resin and the matching hardener. When these two components are mixed, a chemical reaction occurs, which causes the mass to harden for some time. And this brings us to the special features of casting resin – its thin consistency. This property allows the resin to penetrate and fill even the smallest gaps and cavities. The thinner consistency also has an influence on the curing time, which is considerably longer. With the casting resin, we therefore have a highly specialised product for very specific applications.
The Best Resin for Casting
There is a large number of different resins available for purchase. Unfortunately, manufacturers often use different terms, making it difficult to distinguish between casting resins and epoxy resins. Terms such as laminating resin or gel / topcoat are also frequently used, which can lead to costly mistakes. We have compared the best casting resins with each other and compared them in a clearly arranged table.

- Thick pours up to 2" per application, low viscosity and long working time
- Super clear results, compatible with pigments and dyes
- 2 : 1 mix ratio by volume (100 A to 44 B by weight)
The Differences Between Casting Resin and Epoxy Resin
Casting Resin
- Low viscosity consistency
- Significantly longer curing times
- Therefore longer processing times
- With casting resin thicker layers can be cast
- Due to the thin consistency, layers of paint mix quickly
Epoxy Resin
- More viscous consistency
- Faster curing times
- Relatively short processing times
- Only thin layers up to a maximum of 2cm possible
- ink layers remain rather separated and can be controlled better
Coloring Casting Resin
Casting resin can be colored like epoxy resin with color pastes, alcohol inks and color pigments. Our guidebook coloring epoxy resin presents these in detail and gives many tips for application.

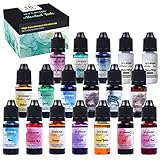

Since casting resin is low viscous, i.e. thin-bodied, different layers of paint mix faster than with epoxy resin. This does not play a role in most applications, but for example in resin art a good color separation is important.

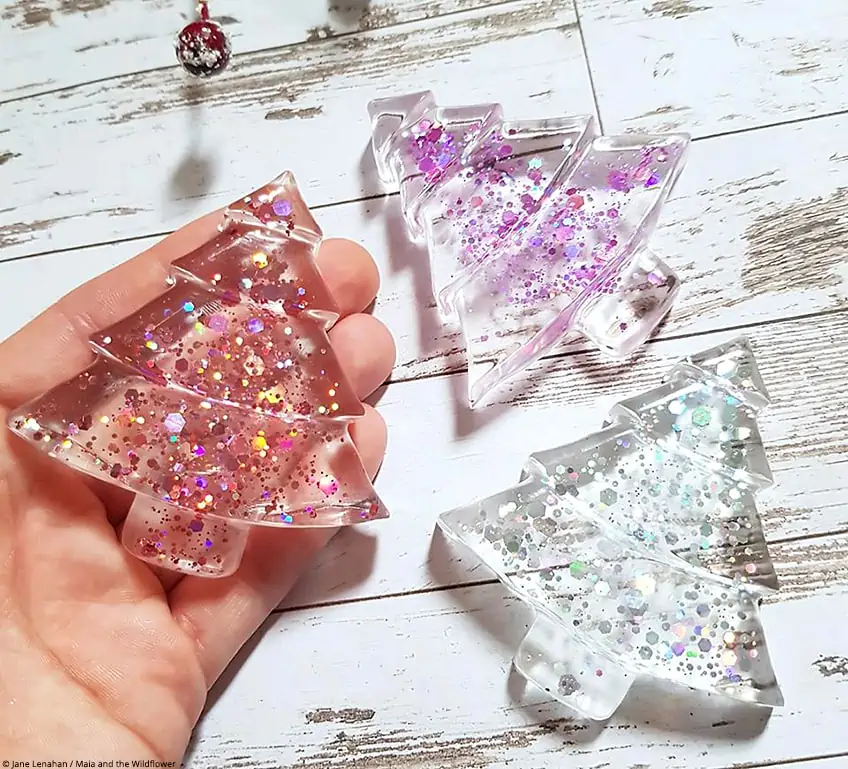
Casting Resin Molds
The fastest way to start with Resin casting is using silicone molds. They are available in different shapes and sizes – from small resin casting molds for producing resin jewelry to big molds for casting spheres and other geometric shapes.


Maximum possible Layer Thickness
Casting resins usually cure much more slowly, so they produce less heat. This allows significantly thicker casting layers of up to 10 centimeters. The maximum amount that can be processed at once is also increased, so that depending on the product, up to 10 kg can be processed at once. However, please note the manufacturer’s instructions, as there are also products with which a maximum of 5 centimeters thick layer can be cast at once.
The heat development is generally a very important issue, because if the layer is too thick or too large, epoxy resin in particular can become so hot that it can cause burns. The quality of the cured mixture also suffers, so that total damage to the project can be the result. If the casting resin also becomes too hot due to the exothermic reaction, toxic fumes are released. Therefore, always wear protective clothing and a breathing mask.
Curing Times
Casting resins need up to one week to cure completely. The huge advantage lies in the processing time: If epoxy resin can only be processed for a few minutes up to one hour, Resin Casting Resin offers products with a processing time of up to 24 hours. This has several positive effects:
- For larger areas, this leaves more time for casting and embedding
- Especially with large quantities of resin with different colors a lot of time is needed
- Air bubbles can escape much longer due to the open time
Apart from the greater patience until the project is finished, there are basically no disadvantages as long as the casting resin is also used for the correct application.
For which Applications is Casting Resin suitable?
In order not to suffer any setbacks, you should always consider using the right product before pouring resin. Cast resin can be used for the following applications:
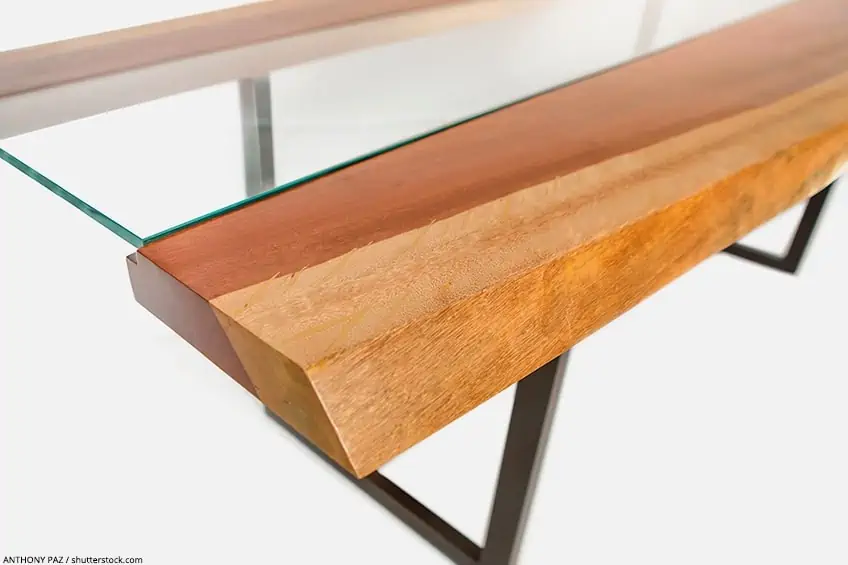
- Cast resin table / River Table
- Resin Jewelry
- Pouring into silicone molds or other molds
- To fill wood with epoxy resin
Instructions for Resin Casting Application
Preparation of your Resin Casting
- Provide all necessary materials so that they are always at hand
- Protect the workplace with a cardboard or plastic sheet
- If you want to pour out wood or other materials, tape off any holes well so that the resin remains where you want it to be. It is always astonishing where the thin-bodied casting resin finds a way where it does not belong.
- If you want to cast objects or pour wood, seal the surface with a little epoxy resin first
- Read the cast resin manufacturer’s instructions regarding mixing ratio and other safety-relevant information
- Protect yourself with the appropriate protective clothing, safety goggles, nitrile gloves and breathing mask
Mixing Epoxy Casting Resin
- Weigh resin and hardener accurately
- Mix both components carefully and for a few minutes
- If you want to color the epoxy casting resin, add the color paste or color pigments and mix the whole thing again thoroughly
- Let the whole thing stand for one minute so that some of the air mixed in can escape
- Pour the resin mixture into the mold or the cavity to be filled
- Any air bubbles can be removed with a hot air dryer or a Butane Torch
Casting Objects
- If you want to cast objects, first pour a small amount of resin
- Then place the objects to be poured in with a toothpick or wooden spatula
- With heavy materials, the first layer should already be dry so that they do not sink to the bottom
- Fill up the mold generously afterwards, as the material may shrink a little during curing

Clear Casting Resin – How to Achieve transparent Results
If you do not want to color your casting resin, then for most applications it is desired that the casting resin hardens crystal clear.
- Use high quality clear casting resin products from brand manufacturers
- Pay attention to a high-quality UV filter
- Exact compliance with the mixing ratio
- Coating with an additional varnish with UV filter can give better results
Tip: Even if all these points are observed, it is important to know that no casting resin is completely immune to yellowing over time. Especially when used outdoors in wind and weather, this cannot be prevented to a certain extent.
Hardness of the Surface
In general it can be said that epoxy resin surfaces are harder than those of cast resins. This need not always be a bad thing, because lower hardness means more flexibility, which can be a great advantage especially when working with wood, glass or other changing materials. For example, wood shrinks due to changing temperatures or humidity. It is important to consider whether these properties are desired or not. For a table or a surface with a high mechanical load, an epoxy resin, which forms a hard and abrasion-resistant layer, is the better choice. It is therefore worth applying a layer of epoxy resin as a finish to achieve better mechanical strength, for example on a wooden table.
Susceptibility to the Inclusion of Air Bubbles
Both epoxy resin and cast resin Both materials are equally susceptible to air bubble entrapment. Air bubbles can escape more easily with epoxy resin because it is a thinner layer. This allows the bubbles to rise to the surface faster and thus burst. However, cast resin also has an advantage with regard to air inclusions: Due to the long pot life, the air bubbles have longer time to escape from the cast resin.
But also when working with casting resin, you can make some preparations to avoid air bubbles as far as possible, even with thicker layers. If you are working with porous surfaces such as wood, you can apply a thin layer of epoxy resin in advance. This will seal the surface and prevent air bubbles from escaping from these porous surfaces and getting into the resin.
The same applies to objects that you want to embed in the resin – a sealant always helps to reduce air inclusions in case of doubt.
Further Casting Resin Material
For the processing of casting resin and hardener and the paints there are other tools and aids for the processing of epoxy resin. We present the most important ones here:
Weigh and Mix Epoxy Resin
To mix resin and hardener in the perfect ratio, it is worth using a digital scale. For cast resin systems which are mixed by volume, a suitable measuring cup will help.


Additives and Material for Embedding
Casting resin is predestined to embed objects in it. There is no limit to the imagination – there are no limits to dried flowers, animals and stones.


Safety Measures for Processing Resin
Casting resin is not harmless if still liquid – it should never come into contact with the skin. Therefore nitrile gloves are obligatory during processing. Eyes should also be protected with goggles and a respiratory mask helps to prevent any evaporation during processing.


Resin Casting with silicone molds – Tutorial
We will introduce you to the resin casting technique. More precisely, the embedding or casting in resin of various materials. We show you with the help of detailed illustrated instructions how to make such decorative epoxy resin castings yourself.
What is Resin Casting?
Working with epoxy resin has been an integral part of the DIY scene for some time now. Absolutely hip in this area is the so-called “Resin Casting”, in which various objects such as natural materials, small stones or glitter etc. are embedded in epoxy resin.
To give the resin an attractive shape, the desired elements are poured into a plastic mold together with a suitable resin. molds made of silicone have proven to be particularly suitable, as they are extremely flexible and thus make it much easier to loosen the workpiece after curing. The absolute top class here are polished silicone molds. Their smooth, shiny surface on the inside guarantees an even, glossy result, where further finishing such as sleeping or polishing is usually unnecessary.
Pouring synthetic resin Step by step guide
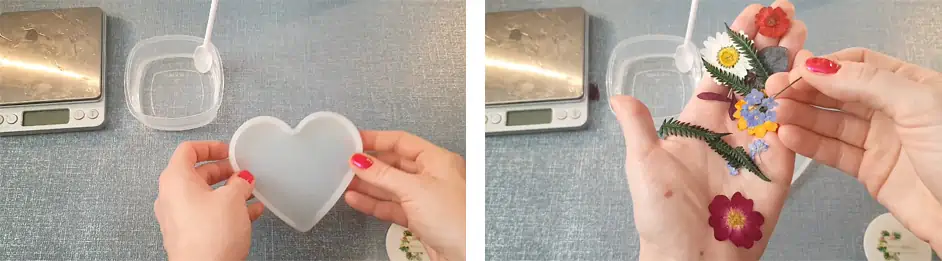
Preparation of equipment and materials
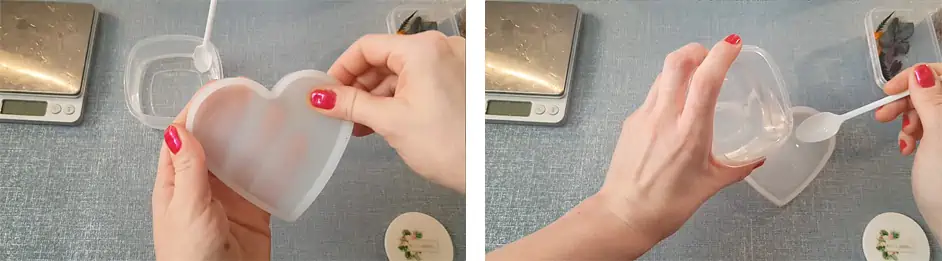
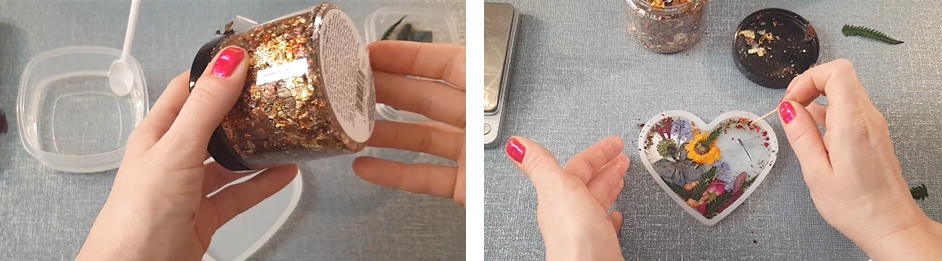
The procedure is explained here using the example of a decorative heart with dried flowers, natural materials and mica flakes.
First of all, you should place all the materials and tools you need so that you have them handy. Resin for resin casting is delivered with detailed information and manufacturer’s instructions regarding the exact processing method and important safety instructions. Please read this information carefully before you start working.
This is especially true if you have little or no experience in processing epoxy resin. Due to the fact that the material of different manufacturers can also have different properties in further processing, this procedure is extremely important. Safety glasses, gloves and respiratory protection should be mandatory for your own safety when using the resin. You should also cover the working environment with e.g. a foil to protect it from damage caused by the resin.
Mixing the Resin Resin
In our example we use a 2-part low viscosity epoxy resin. This is always mixed in the ratio 2 : 1. Here too, however, manufacturer-related differences are possible, so please observe the manufacturer’s instructions. To make the bubbles in the resin disappear, let it stand for about one minute after mixing. Alternatively, you can also briefly (!) wave a hot-air dryer over them.
Pouring the base
To avoid later contamination of the finished part, thoroughly clean the mold used from dust, stains or foreign matter before pouring the resin. Only then start resin casting of the first layer. In our example, we want to produce a decorative heart that is only a few centimeters high and is therefore only cast from two layers.
If you would like to cast a larger piece with a deeper mold, you will have to work in several layers. It is essential to pay attention to the manufacturer’s instructions on the packaging, as the maximum thickness of a layer can vary depending on the brand of epoxy resin.
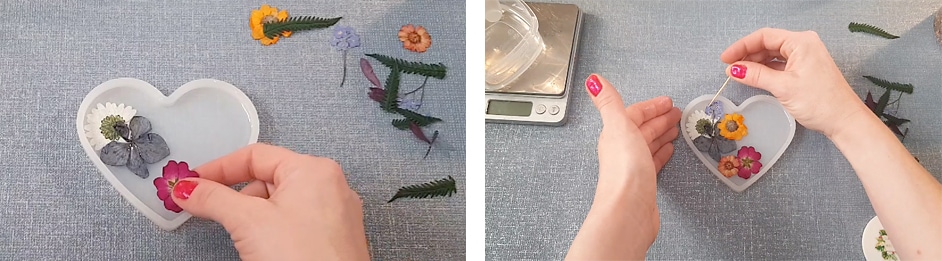
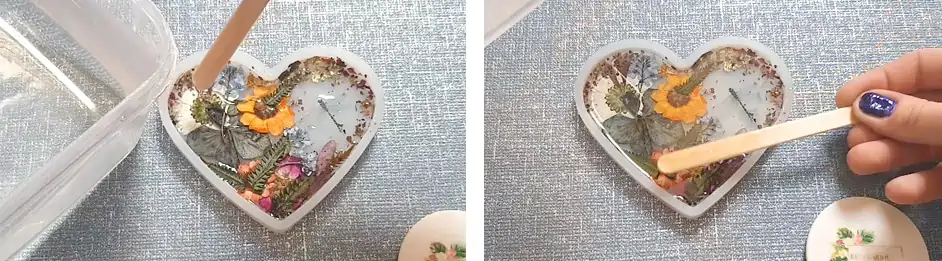
Positioning of the decorative elements
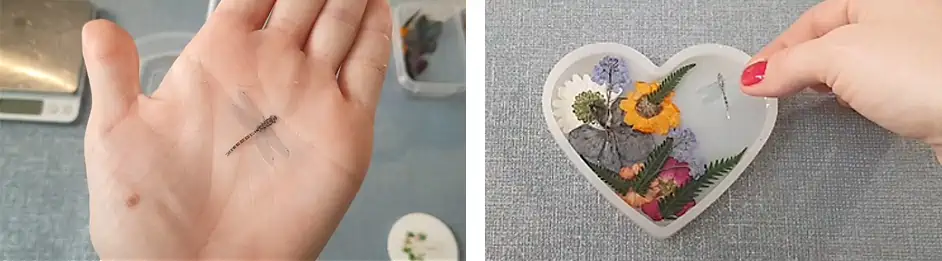
After you have poured the first layer of epoxy resin, the so-called base, remove the bubbles that have formed in the same way as when mixing. The decorative elements of your choice are then placed on this base. Besides the dried flowers, natural materials and mica flakes, in our example a small plastic dragonfly is used.
We put the elements into the still liquid resin, as this is a very light material. If you want to use heavier things like crystals or stones, the whole thing has to be put on the already dried resin to prevent the material from sinking. By this procedure you give the impression that the objects are “floating” in the resin.
Under certain circumstances, small air bubbles may form around the objects when they are inserted. However, these can be easily removed by moving the elements back and forth and carefully pushing them down. A toothpick is very useful for this. There are of course no limits to creativity when selecting and positioning the decorative elements.
Tip: Elements with a “chocolate side”, as is the case with flowers, for example, should be placed in the resin with this side facing down. The reason for this is that the underside of the silicone mold will later be the “beautiful” front side of the piece.
Allow the first layer to cure
Now the base should dry thoroughly. If necessary, new bubbles may form in the epoxy resin, which should be removed before curing. As it often happens that the inserted decorative elements shift just at the beginning of the hardening, please make sure that they stay in place. Regarding the curing time, please observe the manufacturer’s instructions. Some manufacturers recommend not applying the second layer until the base is completely dry. Others, on the other hand, recommend pouring the second layer on top of the not yet fully cured layer, as this allows the individual layers to bond better.
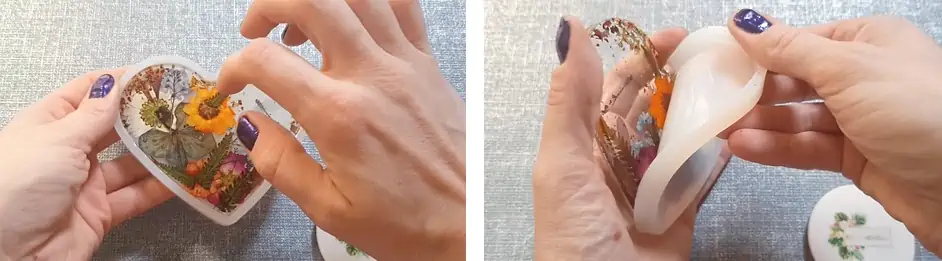
Casting the second resin layer
For resin casting of the second layer, you must first mix new casting resin after the base has cured or dried. Proceed in the same way as with the first mixture. After mixing, you should go over the finished resin with a hot-air dryer to remove any bubbles. Then fill the mold completely with the epoxy resin. To prevent the formation of bubbles, the hot-air blow-dryer is also used here again. Another advantage of this procedure: If there are badly mixed parts in the resin, this prevents them from “floating up” and leaving a sticky layer on the surface of the finished piece. Even during this phase you should always make sure that the mold is free of dust and hairs. While the second layer is drying, it is also advisable to check again and again whether bubbles have formed in the resin. These can then be removed immediately.
Release from the mold
After the curing time recommended by the manufacturer, please check if the resin is actually sufficiently dry to release it from the mold. This is the case if it is not yet completely hard, but also no longer sticky. Caution is required when releasing. Since the element is not yet completely hardened at this point, it is quite possible that it will bend slightly during this process. If this is the case, the object must be carefully restored to its original shape before final curing. It is important that the release is carried out on a clean, smooth and even surface.
Images: © Jane Lenahan / Maia and the Wildflower
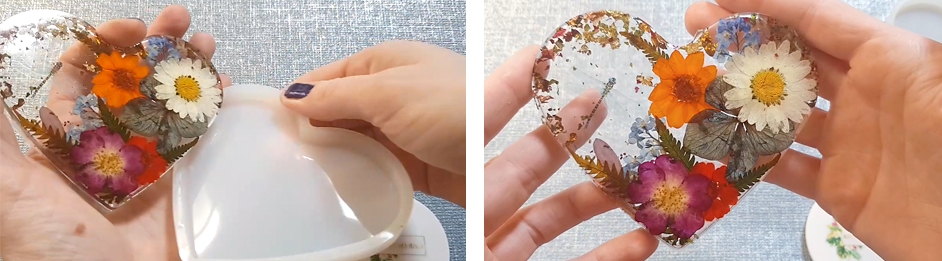
Last but not least: The Finish
After release, the edges of the cast unique specimen may be slightly rough and sharp-edged on the back. However, this can easily be corrected with a fine micro mesh or simple sandpaper. If you have worked with a polished silicone mold, the work itself usually does not need to be reground, as these molds are extremely smooth and shiny and produce an almost perfectly smooth surface. We have prepared detailed instructions for you on the subject of grinding and polishing epoxy resin.
When sanding the edges, you should therefore only take care not to slip off accidentally and damage the smooth surface. Now you have the possibility to decorate your finished object, e.g. with a bow or a jute ribbon, by drilling a small hole in the cast piece and passing the decorative ribbon through.

A little tip at the end: Unique pieces made of epoxy resin and flowers or natural materials should be protected from direct sunlight. Otherwise they could fade and lose some of their luminosity.
Source: Jane Lenahan von «Maia and the Wildflower», https://maiaandthewildflower.blogspot.com

Frequently Asked Questions and Answers
How long does Casting Resin need to harden?
This varies greatly depending on the product and formulation. Casting resin also has a longer drying time of approx. 24 to 48 hours due to the longer open time compared to epoxy resin.
What can be poured into Casting Resin?
You can cast all materials in casting resin. Materials that contain air, such as wood or other porous materials, should be sealed with a thin layer of epoxy resin in advance to prevent air bubbles from escaping during pouring, which can be difficult to remove.
How stable is Casting Resin?
Casting resin is extremely stable and resilient. Therefore, epoxy resin table tops can also be cast with it without any problems.
How hot does Casting Resin get?
In contrast to laminating resin, casting resin becomes much less hot, as the exothermic reaction is delayed. This is also the great advantage of this material – especially for thicker layers and larger quantities.
Which molds for Casting Resin?
Silicone molds are ideally suited for smaller objects. However, larger areas can also be filled with casting resin, which are surrounded by a wooden construction.
What does Casting Resin cost?
Cast resin is not exactly a cheap material. For one litre of resin and hardener you can ask for up to 15 Dollars. But here it is worthwhile to rely on high-quality products so that the result will not be a disappointment.
