How to Make Resin Letters – Casting Epoxy in Alphabet Molds
This post may contain affiliate links. We may earn a small commission from purchases made through them, at no additional cost to you. You help to support resin-expert.com
If you have been active in the craft world over the last couple of years, you may have noticed a shift in mediums favored to create a variety of both professional arts and crafts. Resin has opened up a world of creating stunning detailed, polished pieces that offer an aesthetically pleasing impact combined with durability. Resin is largely affordable, which is why it is used often by DIYers and professionals alike. Resin alphabet letters is one of the popular entry-level castings, readily available to use, and simple enough for anyone to create. But you may wonder why this type of resin art is so popular? In this article, we will have a look at what you will need to start creating resin alphabet letters and why this is an exciting way to use resin.

Table of Contents
What Do You Need to Make Resin Alphabet Letters?
Before we start looking at how to make resin letters, we think it is a good idea to know exactly what you can do with resin alphabet letters once you have decided to make them. Resin alphabet letters are small (or large) letters created using resin. The art is can be customized to your heart’s desire, offers amazing durability, and can be used for an assortment of applications. All in all, it is a useful, fun activity for any DIYer!
The letters can be used for so many things, from fridge magnets, educational purposes, décor, and smaller letters can be used on pieces of jewelry on things like necklaces or friendship bracelets. Resin alphabets are a lot of fun to create. We have put together a list of what suppliers you will require to create resin alphabet letters:
- A work area with good ventilation
- Epoxy resin
- A face mask
- Wipes or a clean cloth
- Gloves that are graded for resin
- Resin dye, paint, glitter, sparkles (optional)
- A mixing stick
- A measuring cup that is graded for use with resin
- Alphabet molds for resin
- Two little silicone beakers
The majority of these items are easily available and can be purchased in kits specially designed for creating DIY resin letters, they can however be quite expensive and may include additional items you do not need, resulting in wasted money. People tend to purchase all the items they require separately, as it means you can shop around and as a whole save yourself some money.
Best Small Resin Letter Molds: TOMOROTEC Small DIY Silicone Resin Mold
You can use smaller letters for an assortment of things, and Tomorotec’s team knows this. They have made small resin letter molds that are simple to use, well priced, and versatile for all your resin letter needs. In addition, these molds are completely customizable, easily available, 3D, and have racked up many positive user reviews. The kit comes with more than just resin letter molds, it also has symbols and numbers that you can use if you are looking to create a phrase or something like a casting of Happy Birthday, with the person’s age. In addition, this kit comes with 20 key chain adaptors, this means you are not limited to only using them for pasting, and they come in both gold and silver so you can select the one which goes with your color scheme.
The quality of the silicone used in their manufacture means that these molds will not become brittle over time. Instead, they will keep their shape quite well and you can use practically any type of resin with them. When using a coloring agent such as food coloring, mica powder, acrylic paints, or other coloring mediums they will not stain. Overall, they are an incredibly durable product.
Thanks to Tomorotec’s anti-adhesive surface on the inside of the mold, the resin art letters will not stick to the mold. This decreases the chance of your casting tearing or breaking when demolding it. These molds are also super easy to clean, all you will need is a small amount of rubbing alcohol and some elbow grease. To avoid the molds becoming brittle over time you should ensure that they are stored in a dry, cool space, and are not exposed to direct sunlight.
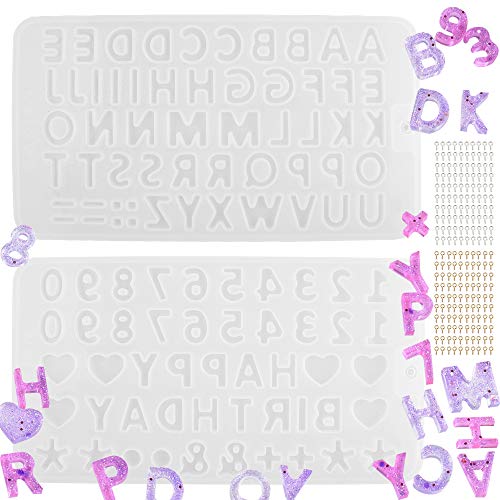
- Set includes 2 quality silicone mold trays and 200 screw eye pins
- Produces 3D letters, numbers, and symbols 0.7” tall and 0.6cm thick
- Super smooth non-sticky interior needs no release agent or polishing
- Will not easily discolor or stain
- Simple to use
- Well priced
- Anti-adhesive surface
- 20 keychain eyelets included in the kit
- Simple to clean
- Casts for symbols, letters, and numbers
- Eyelets could be a potential choking hazard for young children
- The silicone that the molds are made of is not environmentally friendly
- Kit does not include resin
- Molds may be too shallow for certain applications
Best Deep Pour Resin: INCREDIBLE SOLUTIONS Deep Pour Clear Casting Resin
INCREDIBLE SOLUTIONS Deep Pour Clear Casting Resin is a high-performance epoxy resin designed for deep pour projects up to 2 inches in a single pour. This premium resin is perfect for creating river tables, encapsulating objects, and other large-scale resin art projects. Its crystal-clear finish enhances the natural beauty of embedded materials, providing a glass-like appearance that brings out the depth and detail of your work. The resin’s self-leveling properties ensure a smooth, even surface, while its low odor and low VOC formula make it safe and pleasant to work with indoors.
In addition to its exceptional clarity and depth, INCREDIBLE SOLUTIONS Deep Pour Clear Casting Resin offers excellent UV resistance, preventing yellowing and maintaining the vibrancy of your projects over time. The extended working time allows for meticulous adjustments and the incorporation of various pigments and additives, enabling limitless creative possibilities. Whether you are an experienced resin artist or a DIY enthusiast, this resin is formulated to deliver professional-grade results with minimal effort, making it an ideal choice for ambitious, high-quality resin creations.
This deep pour resin is perfect for use by professional and beginner crafters alike, and it comes with simple-to-follow instructions, so casting is easy to do and provides stunning results. This type of resin has been formulated for use with silicone letter molds for resin, so pouring can be done with ease.

- Thick pours up to 2" per application, low viscosity and long working time
- Super clear results, compatible with pigments and dyes
- 2 : 1 mix ratio by volume (100 A to 44 B by weight)
PROS
- Deep Pour Capability
- Simple to use
- Crystal Clear Finish
- UV Resistance
CONS
- Extended Curing Time
- Higher Cost
How to Make Resin Letters
Have you ever wondered how to make resin letters? It is simple to create resin letters and is quite a fun activity, but it can seem a little daunting for beginners, and the process can feel overwhelming. But not to worry we have put together a short tutorial advising how you go about creating your resin art letters. Follow the simple steps and make sure that your workspace has good ventilation and that you are wearing the appropriate personal protective gear before you begin.

Prepare Your Workspace
Before you can begin pouring your resin, you will need to have your workspace ready for the task at hand. This is quite a simple process, but you should ensure you are prepared to avoid any errors. As previously mentioned, you need to set up in a well-ventilated area. You can then protect your surfaces from any stray resin by using some newspaper or tarp to cover them.
Your working environment needs to be suited for resin curing, so you want to reduce the ambient humidity as much as you can, and you also want to ensure you are working in an area free from dust. Keep all the products you will be using, which include the hardener and resin, mold, cloths, mixing tools, and a heat gun within easy reach.
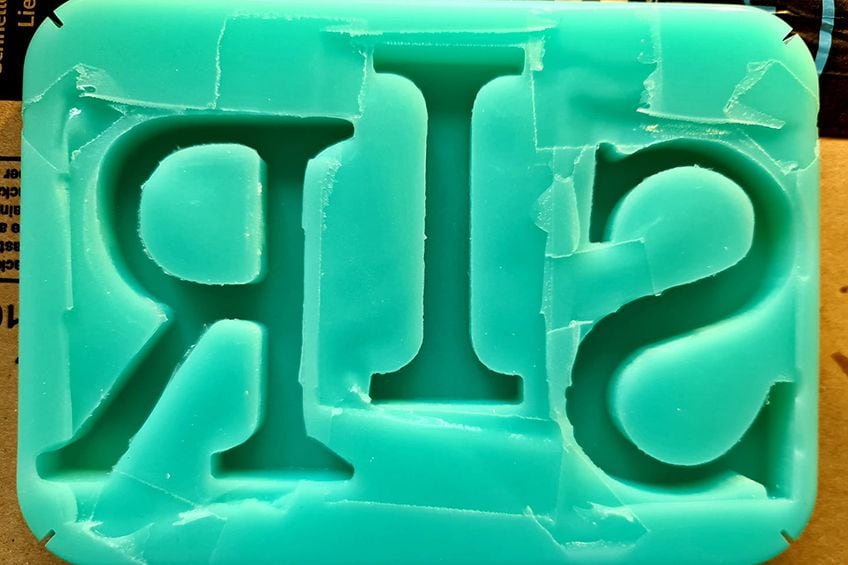
Prepare Your Mold
While you may not think it is necessary to prepare your mold, it is an important step when casting. Use a dry rag to clean your mold thoroughly. Once you are happy that it is clean you can apply some film or anti-adhesive spray. Ensure when applying anti-adhesion spray, that you coat the whole mold. This will ensure that the casting will not get stuck inside the mold once it has cured completely, this also reduces the risk of it tearing or cracking during this process.
If you have any items that you would like to appear on the surface of your resin such as glitter, photographs, or any other item that you would like to incorporate in your casting, you can then add them to your mold. Ensure that these items are clean of any dust or dirt before adding them to the mold. When you have applied for the mold release, you will need to cover up your mold so that no dust or other foreign particles fall into the mold while you are preparing your resin.
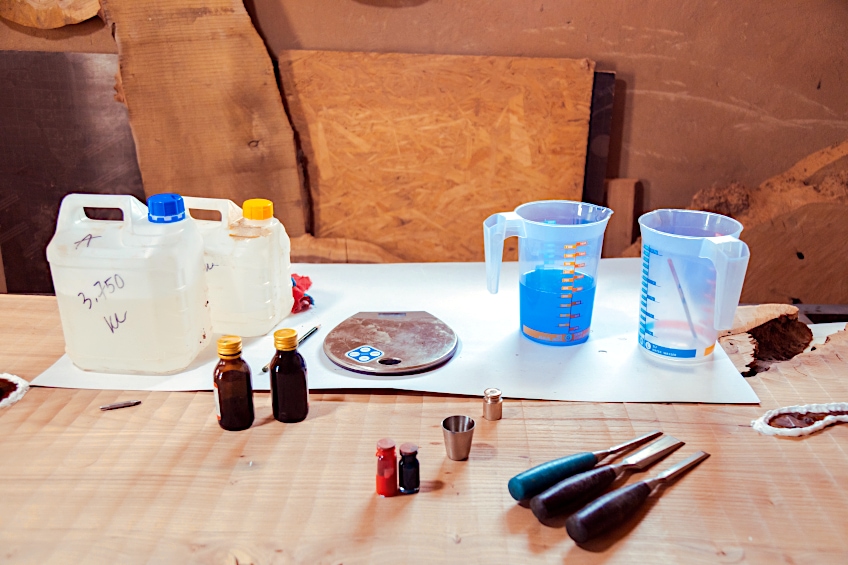
Prepare Your Resin
Before you begin mixing your resin, you want to ensure that you are wearing the correct personal protective gear, such as a face mask and gloves. You want to be certain that you have adequate airflow in the area you have chosen to work in. Next, you will need to calculate the volume of each letter mold you’ll be using to calculate the amount of resin you will require. Lastly. Take a measuring cup and combine hardener and resin. It is important to note that deep pour resin is mixed with a ratio of 2:1 resin to hardener.
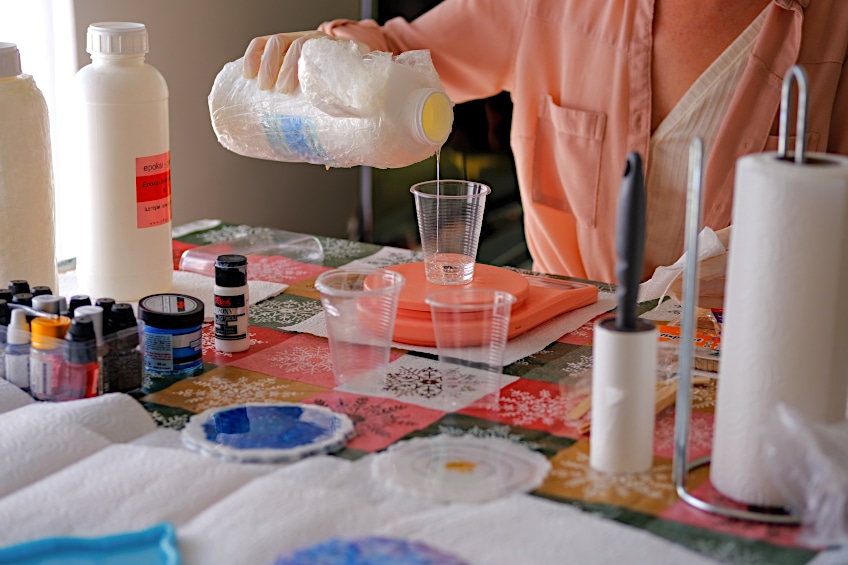
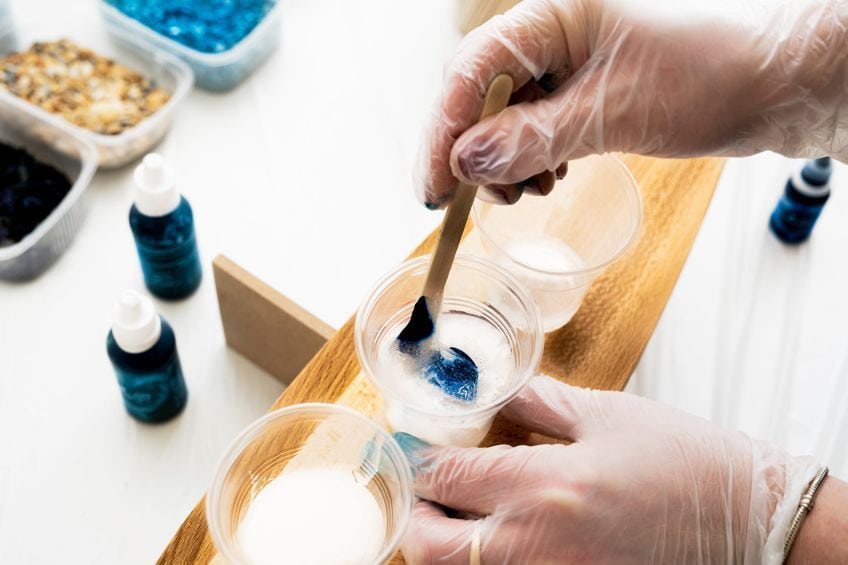
Once you have decanted the amount you require and mixed it carefully and slowly, you can add any colorants you want such as acrylic paint, resin dyes, mic powder, glitter, or food coloring that you may want to. When you are happy with the consistency and color, take the cover off your mold and check that it is still clean before you move on to the following step in the process.
Pour Your Resin
Now for the exciting part. Pouring resin is strange because a lot more of it is required to create a casting, it is significantly runnier when compared with surface pour resin. Regardless, pour with care and slowly, ensure that each mold you are using is filled to the manufacturer’s recommended capacity or the brim. Be careful when pouring, pour slowly and get down to eye level with the mold now and again to ensure that you are filling the mold to the brim with the resin.

Should you accidentally spill some resin on the surrounding area or yourself do not worry, you are wearing gloves and your work surface has been covered with a tarp or some newspaper. If any resin spills onto an exposed flooring or surface area, take a wet wipe or a clean cloth and remove the resin from the surface before it cures. When you are satisfied with the filing of the mold, be certain that you have filled the mold equally before continuing to the next step.

Allow Your Resin to Cure
Now you will have to wait, it can take several hours for the resin to set. The majority of deep pour resin takes roughly 24 hours to completely cure, this gives you time to do a few things. If there are any bubbles in the resin you can take a blow torch or heat gun (depending on the size of the casting you are making) and go over your castings. You want to do a thorough job, and be certain that you have removed all the bubbles that have formed while you were pouring your casting. You can also make use of a toothpick to pop any bubbles that rise to the surface.
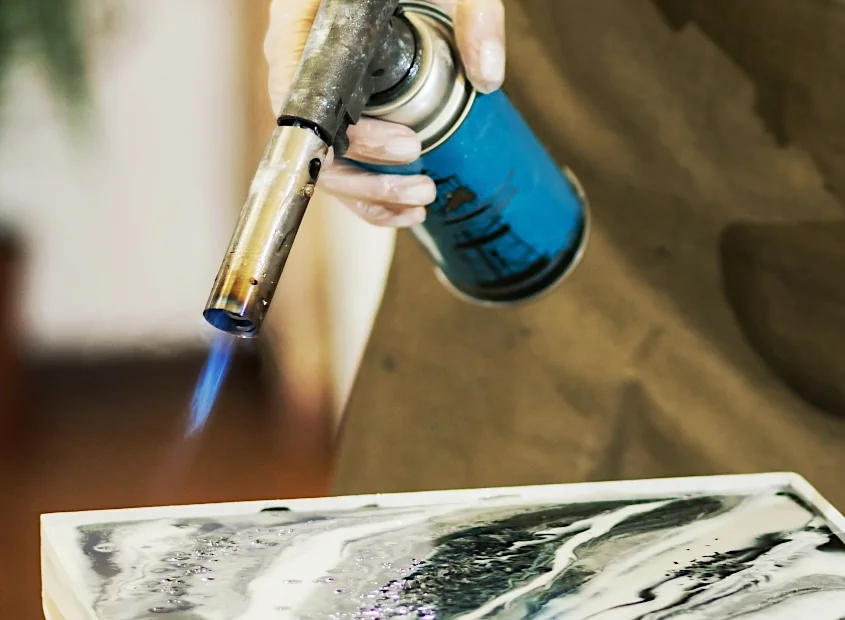
Most professionals use a blowtorch at a medium distance to their workpiece in a circular motion to ensure the best results, but how effective this technique is can vary considerably depending on the density of the casting that you are working with.
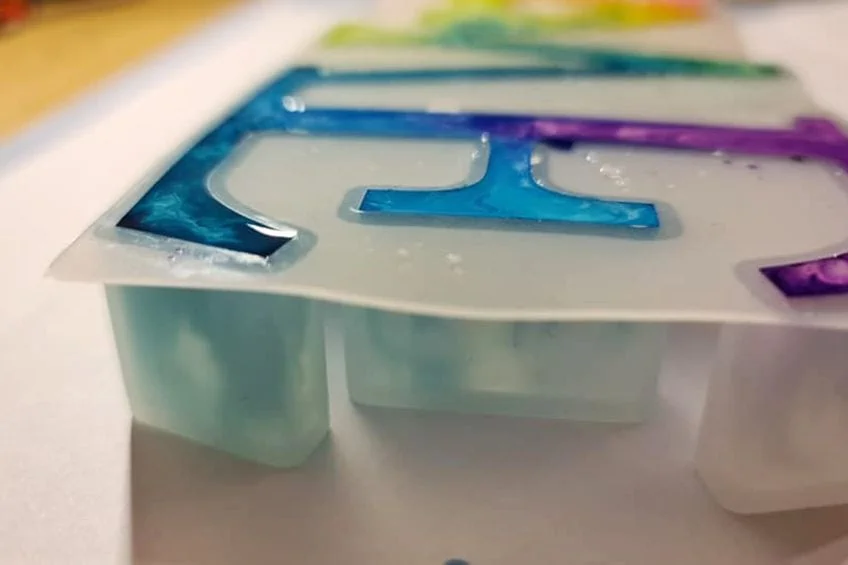
Remove Your Resin Letters
When the 24 hours are over (or however long the manufacturers recommended you allow for setting and curing) you can remove your newly cast letters from their molds. Keep in mind when demolding resin casting, if the mold is bent, it should just pop out with ease. If the casting does not pop out you could have under-applied the mold release, or the resin you have chosen to use has not completely cured.
We recommend that should you have any difficulty de-molding, that you leave your resin to cure for several more hours to be certain, as things such as resin compatibility, temperature changes, and even the quality of the mold can impact the curing process. Once the item has cured, and you have released it from the mold, you can then enjoy your stunning new resin art letters!
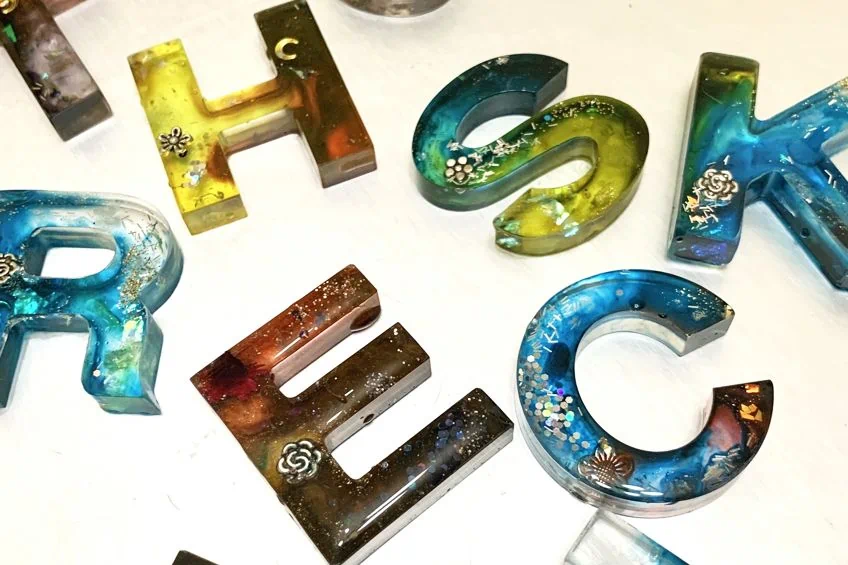
Some Resin Letter Ideas
If all of the above seems a little daunting, here are several resin letter ideas to provide you with a bit of inspiration. These are simple, and you can easily add your creative twist to them as you work. Always remember that the goal is to have fun and create some resin art that you and your friends and family can enjoy.
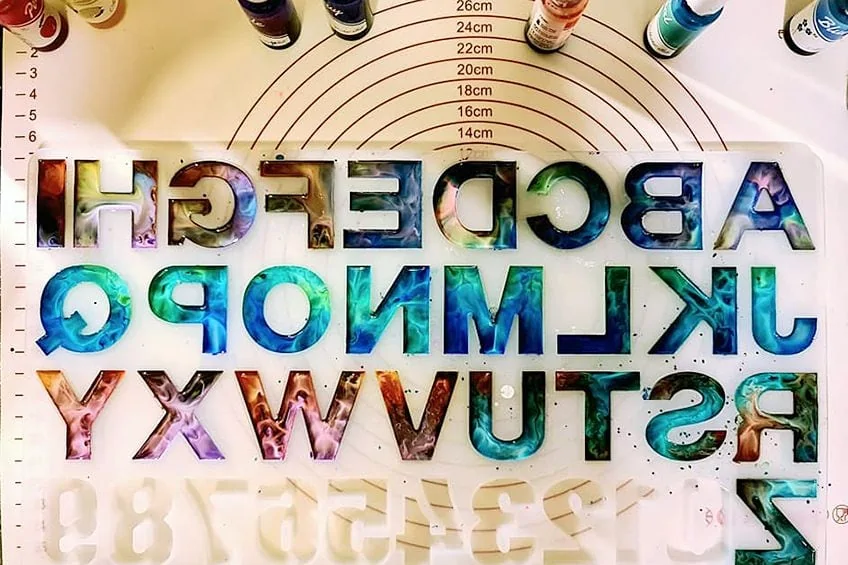
Tinted Resin Letters
Tinted resin letters are a great project for beginners, thanks to them being easy to color. You will end up with resin letters that make one think of stained glass, which looks stunning on earrings, keyrings, and bracelets. All you need to do is add a little dye to your resin mixture and combine it thoroughly. You can add more if you require a darker tint. If you are on a budget you can use some oil-based food coloring, but for more intense color, it is best to use either alcohol ink or mica powders. You will produce resin letters that are almost glass-like, without having to actually work with glass. This method is an affordable way to elevate your resin letters.
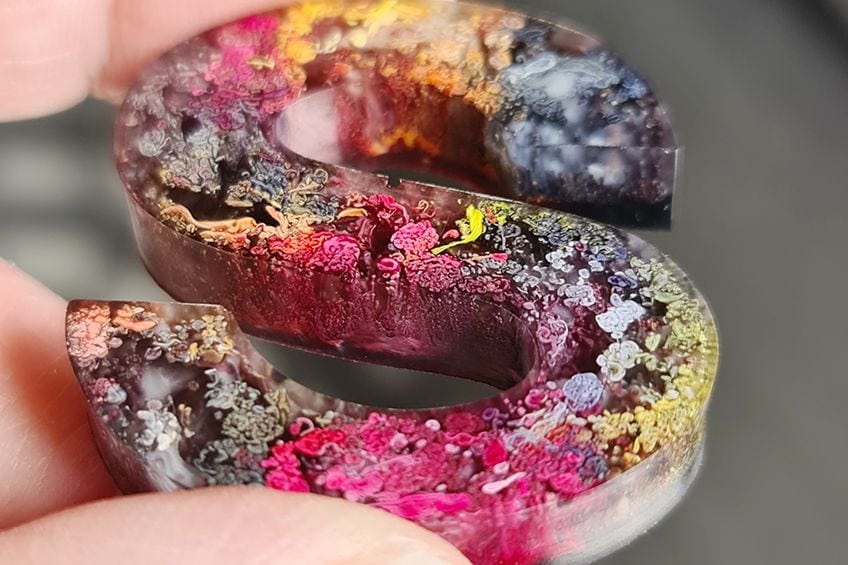
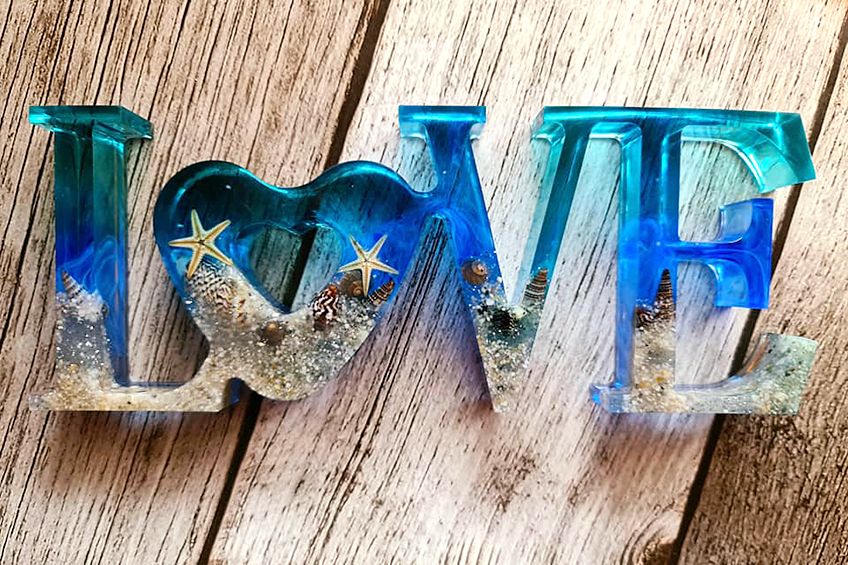
Flower-Filled Resin Letters
This is a particularly popular option but is not often attempted by beginners. What are flower-filled resin letters? Basically, these are letter castings containing dried flowers. Start by ensuring the mold release is applied to the resin mold, then position your flower petals into the mold. Next, combine your resin and hardener and pour the mixture in, begin around the petals and not over the petals.
Of course, the resin will require sufficient time to set and cure. You will be left with stunning flower petals, immortalized forever within the resin. Create a stunning keepsake that is a great way to preserve flowers from a special moment in your life.
LED Resin Letter Art
This can seem quite intimidating to a beginner, but not to worry, you will be able to pull this off with ease. This is an exciting option as resin refracts light in unique ways depending on its shape and the type of resin that you have used in the casting. You can exploit the light refraction by adding small LED lights either on the surface of the letter resin casting or inside the resin casting. We do not recommend using LEDs inside the resin casting if you are just a beginner, as it can prove to be quite challenging, instead just cast your resin letters and incorporate some colors you would like illuminated (mica power works well). You can then add some LEDs below the resin casting when it has cured completely.
Now that you know what you will need to cast letters in epoxy resin, what one of the best deep pour epoxy resin products on the market looks like, and what good large and small resin molds for letters look like, you can begin putting your newfound knowledge to the test. It goes without saying that you should wear the correct personal protective gear when working with resin and that you set up your workspace up in an area that receives consistent and adequate airflow..
Frequently Asked Questions
Can You Glue Resin Letters Together?
Although resin is widely used, once the resin has completely cured, it is very difficult to get most resin types to stick to one another. You would need to purchase a high-quality adhesive to get them to stick together.
Are Resin Letters Safe?
While the resin is potentially a hazard when it is in its two-part form, once it has completely cured, it poses absolutely no risk. Resin that has been 100% cured is completely food safe. Resin and hardener in their two-part form emit dangerous volatile organic compounds (VOCs) and are incredibly flammable.
What Are Resin Letters Used For?
Resin letters can be used for an assortment of things, from educational uses to stamps. They can be used to make an assortment of jewelry from bracelets to necklaces, and are ideal for decorative purposes.
