Epoxy Resin Lamp – Step by Step Resin Lamp Instructions
This post may contain affiliate links. We may earn a small commission from purchases made through them, at no additional cost to you. You help to support resin-expert.com
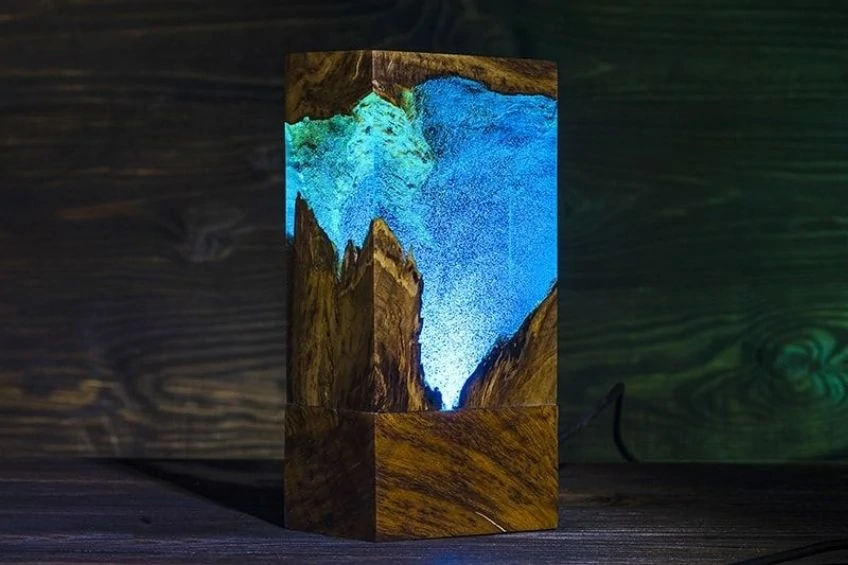
Making a resin lamp is a unique procedure that uses wood and epoxy resin. If you enjoy crafts and DIY, then making your own epoxy resin lamp can be a seriously rewarding process. This is a great combination of creating something useful for the house, as well as an artwork to admire. Let’s unpack the process of how to make a resin lamp step by step, and uncover exactly what you will need to pay attention to when making an epoxy lamp.
The Idea Behind Resin Table Lamps
When it comes to making crafts, there are loads of different ways to get creative, upcycle old items, and make unique creations. The resin lamp became a popular idea on Pinterest, leading many people to attempt to make them. Making your own epoxy resin lamps is not that easy at first, and it will take some time to really master the art of it. Over time, you find your style and start to create quality, unique pieces. Looking on websites like Etsy can help massively with inspiration.
Equipment Needed for a Resin Wood Lamp
Want to make your own resin table lamps? Here are some of the necessary supplies for creating these lamps.
- Epoxy resin
- Suitable wood
- Wood varnish
- Plexiglas
- An RGB LED light
- A module for this light
- Silicone glue
- Hot melting glue
- Sandpaper
- Polishing paste
- Hardener
- Wood wax
- Cable
Suitable Epoxy Resin for Epoxy Resin Wood Lamps

- Thick pours up to 2" per application, low viscosity and long working time
- Super clear results, compatible with pigments and dyes
- 2 : 1 mix ratio by volume (100 A to 44 B by weight)

- Thick super cast epoxy designed for pouring
- Super clear results, compatible with pigments and dyes
- Perfect for epoxy tables and deep resin molds

How to Make a Resin Lamp – Step by Step Guide
Making a great resin lamp will require a few steps in order to achieve perfect results. Here are some processes to take when creating these items.
Getting the Wood Prepared
Before starting the work, preparation and planning are essential. First of all, you need to gather up some stumps of wood. You can order these online or buy them at a woodshop, but one of the best places is to gather up old oak stumps in the forest if this is a possibility. Just make sure that the wood stumps are of high quality, and won’t rot or fall apart over time.
Then it’s time to cut down the wood pieces into the right shape and size for the lamp. Using a band saw to shape and cut the wood will really help. Once cut and prepared, it’s a good idea to leave the wood to dry for a while. The longer you can let the wood dry out the better. There are a couple of different processes to follow when cleaning the wood. These are listed below:
- Simple clean: Use a scraper, knife, or metal brush to do a rough clean of the wood surface. Scrape off any mud, bark, lichen, and dirt of the wood. This can be a messy process so it’s best done outside.
- Deep clean: Once the wood is tidied up, you will need to really get deep in there with cleaning. Use an airstream compressor to make sure that the entire surface of the wood is completely clean.
- Finishing: Once the wood is clean and dry, you can add a layer of varnish to enhance and protect the wood. Coat the pieces of wood with varnish, and leave them for at least 24 hours to dry completely.

Preparing the Lamp
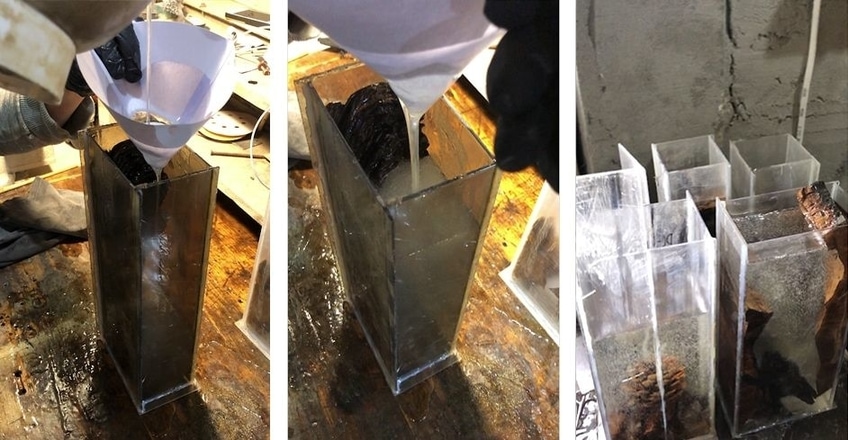
While the wood is being left out to dry, you can start to prepare the work-piece for the lamp. Cut up some Plexiglas into pieces – the size of this should depend on the size of the lamp you are making. When figuring out how big to make the lamp, it’s always a good idea to design it according to the size of the room. If there is a lot of space that needs lighting up, then you will need to create a bigger lamp. Once the varnished wood is dry and ready, use a hot glue gun to stick the pieces of Plexiglas to the wooden base. The aim is to create a kind of box out of the Plexiglas with the piece of wood as the base.

Adding the Epoxy Resin
Now it’s time to start working with the epoxy resin. The first thing you need to do is weigh out the hardener and epoxy resin to the right proportions. Always check the manufacturer’s instructions here to make sure that you get the right mix ratio and consistency.
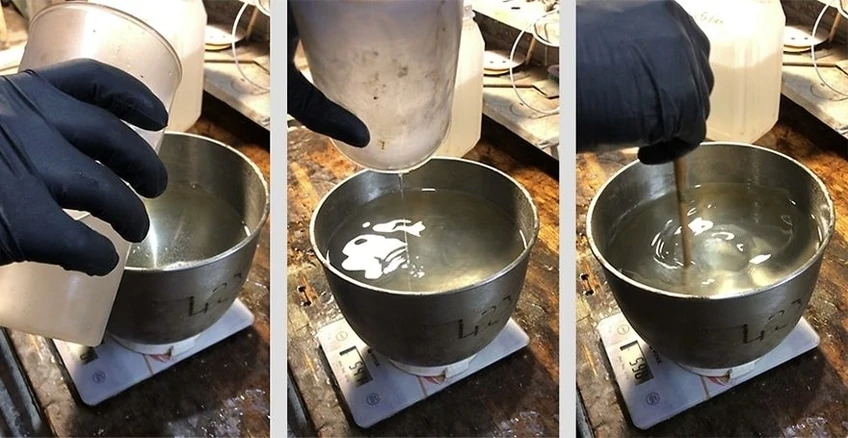
Once measured out, you can thoroughly mix the two components of the resin together. To make sure that you get the best mixture for your resin lamp, mix this for about 20 minutes, and strain it through a filter to get rid of any dust that may have collected.
Pour the resin into the lamp mold, and place this in the degasser. This is done to remove any bubbles that may form. Leave the item in the degasser for about an hour at 20 – 24 degrees Celcius. Once you take the resin out of the degasser, leave the item to cure fully at room temperature. The time this takes will vary depending on the resin and air temperature, but it should generally be left for around two days.
Finishing the Structure
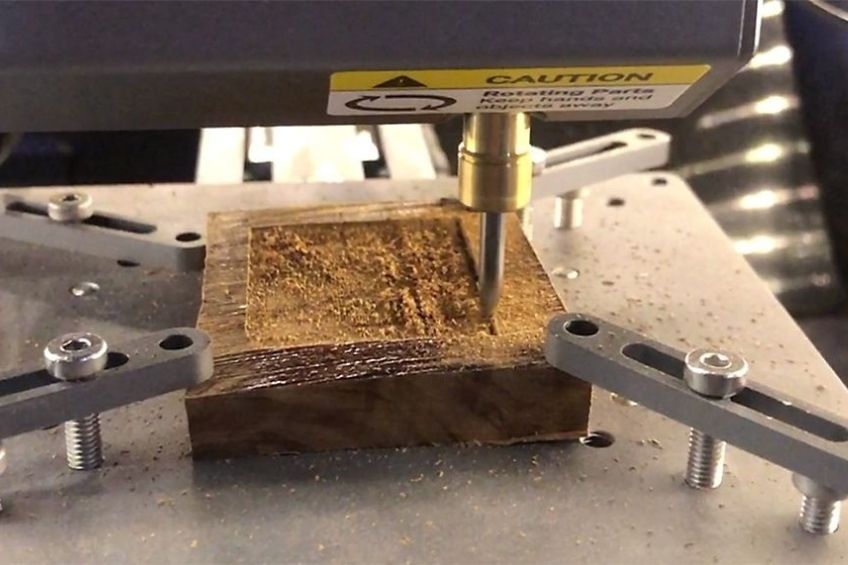
When the resin has fully cured, the wood lamp is nearly ready. Once fully cured, you can remove the Plexiglas from the solid structure. This will leave you with the unfinished lamp. Cut some wood out the bottom and insert the LED light into here. This LED light should be the size of the lamp. You can use a manual milling machine to cut out this hole in the wood, and glue the LED light into the bottom. You will also need to make some holes under the lamp for adding the cable, and the soldered cable for the LED lamp. If you use an RGB LED light, you can control this with your phone via Bluetooth. This can be a really cool feature.
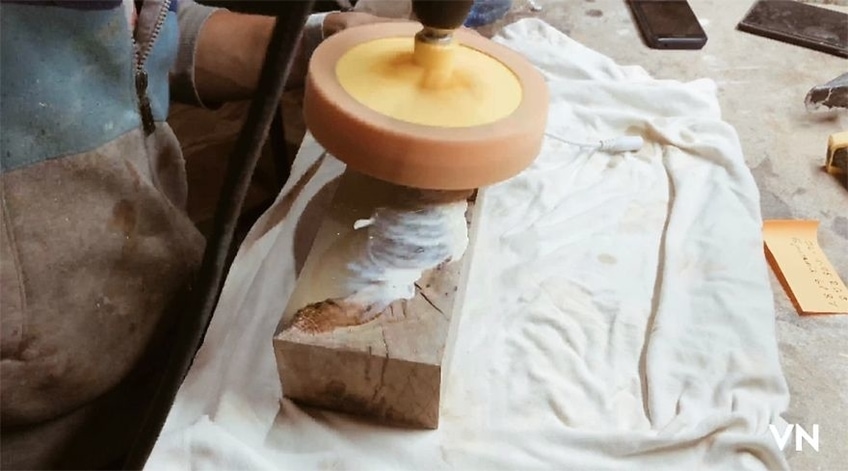
Then you need to join up the underside of the resin work-piece. This is best done with silicone glue and should be left for at least a full day to dry. Now the lamp is ready and dry, but the surface will be a bit uneven and rough. You can amend this by sanding down the entire surface. Start with 60 grit sandpaper, and slowly start to increase the size with each layer of sanding. Eventually, you can finish off the sanding with 2000 grit sandpaper. When hand sanding at the final stages, make the surface of the lamp slightly wet.
Finishing the Resin Lamp
Everything is all ready for use now. Before putting the lamp into place, there are just a few finishing touches that should be done. Polish the epoxy lamp’s surface with some polishing paste that you can use on car headlights. Once polished, chafe the resin lamp with some wax. And there you have it, the lamp is complete and ready to use!
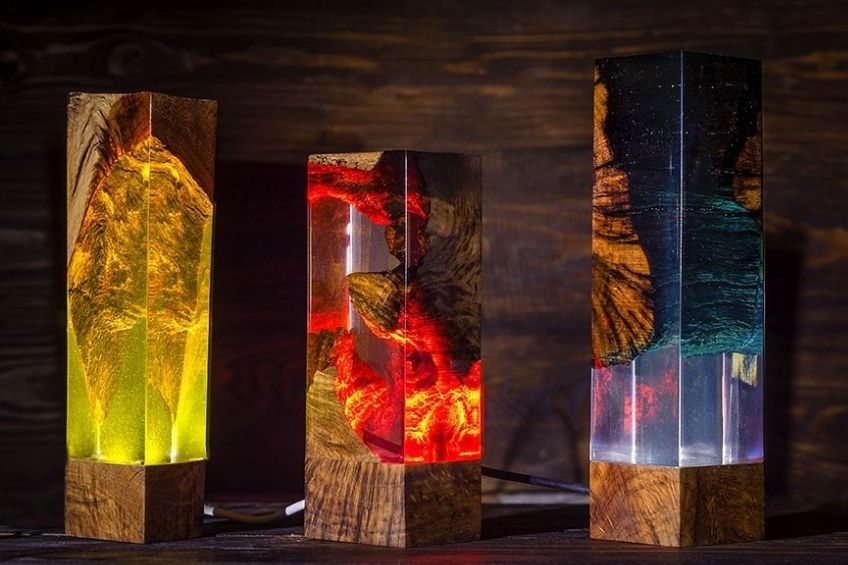
Making resin table lamps can be quite a time consuming and hands-on process. However, the results of your epoxy lamp masterpiece will be sure to have you feeling proud and happy with your work. Making a resin wood lamp is a satisfying process, and it will leave you with a product that you can enjoy for many years to follow.
