Epoxy Tumbler: Best Epoxy Resin for Glitter Tumblers
This post may contain affiliate links. We may earn a small commission from purchases made through them, at no additional cost to you. You help to support resin-expert.com
Do you want to be creative and modify your Tumbler using Epoxy Resin? In this way, by using your imagination, you will be able to craft ordinary Tumblers into Epoxy Tumblers with different colours patterns or a sparkling finish. In this article, we will give you the know-how, as well as advising you of the best Epoxy Resin to use for Tumblers.
Table of Contents
Find the Best Resin for your Epoxy Tumblers
When you are considering the best resin for your Tumblers, you should take note of the following:
- What is the constituency of the resin, is it thin or thick?
- Is the resin compliant with FDA Standards?
- Can the resin resist UV light?
- Is it easy to work with the resin?
- Overtime will the resin turn yellow.
- What type of epoxy resin do most tumbler artists use?
- Is the resin that you use for your tumblers heat resistant?
- When working with the resin does it have a strong smell?
When looking at these requirements, we are confident in saying that no one resin can satisfy all the requirements listed above. Nevertheless, the resins we are going to share with you have proved to be the best epoxy resins available for tumblers.
Please make sure that the resin you have chosen to use complies with the Safety Data Sheet. When the resin states that it is safe for use with food or that it complies with the FDA Regulations, please do your own research to confirm this. This is very important because you must be sure the resin you use is safe for coming into contact with food or your skin. To clarify this matter further, we do personally recommend you do not apply any resin on the rim of the tumbler that comes into contact with your mouth. We also want to urge you to read our article titled “Epoxy Resin Safety Precautions” to ensure that you protect yourself properly when handling epoxy resins.
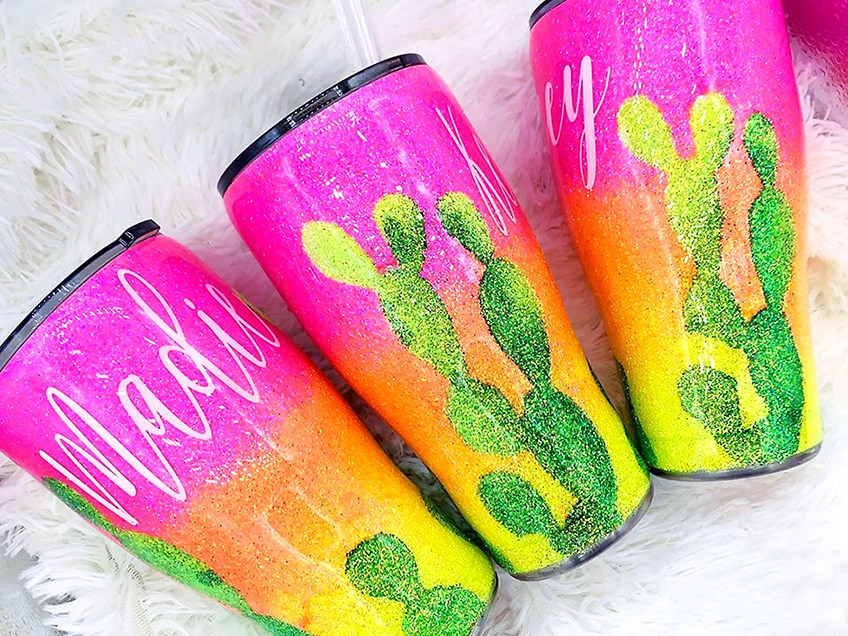
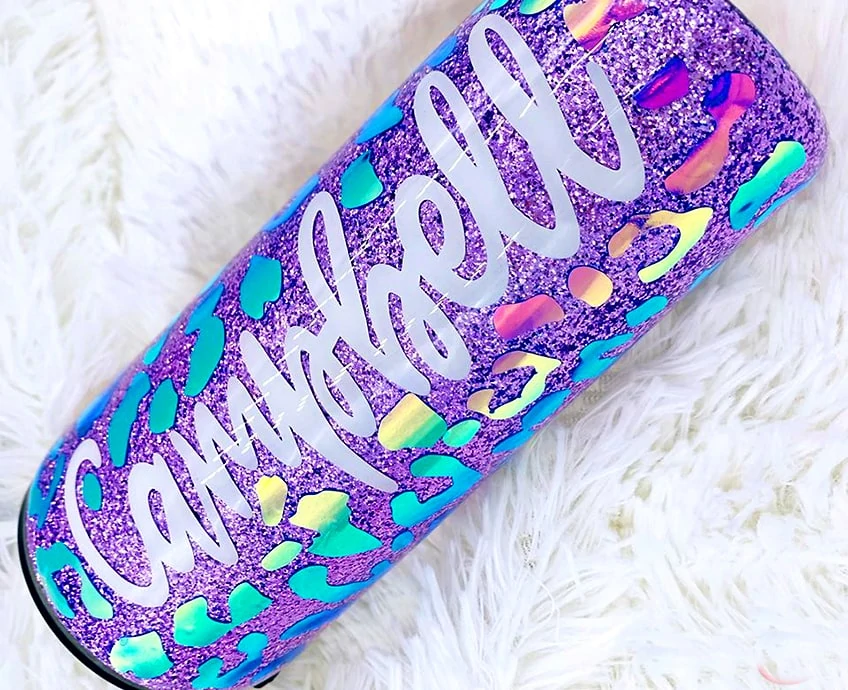
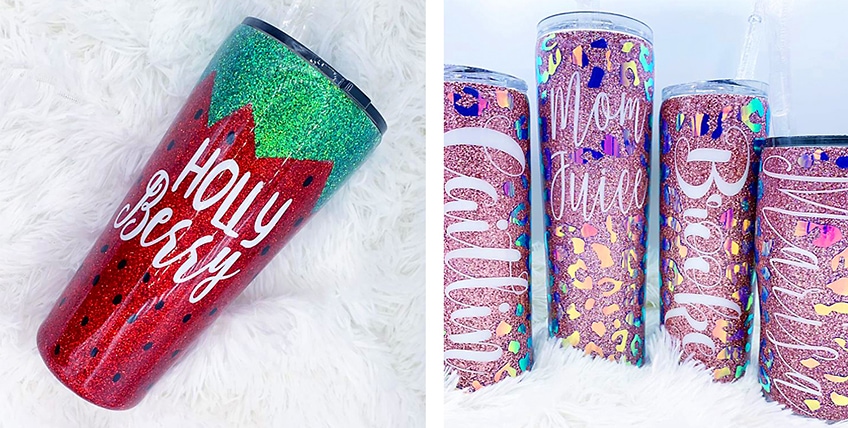
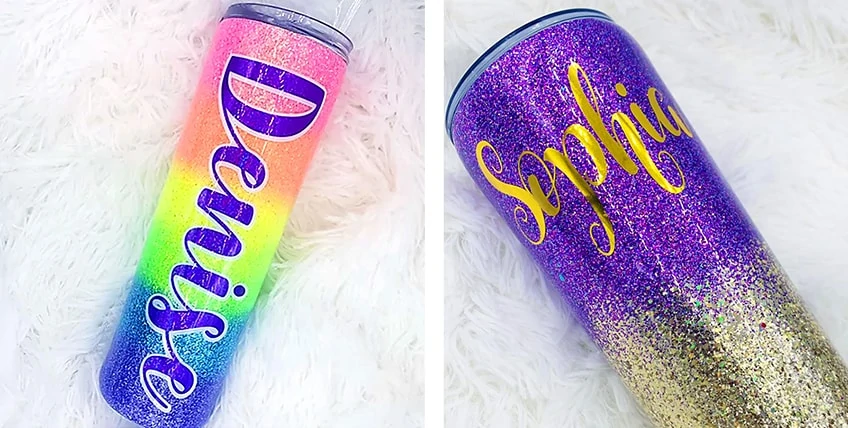
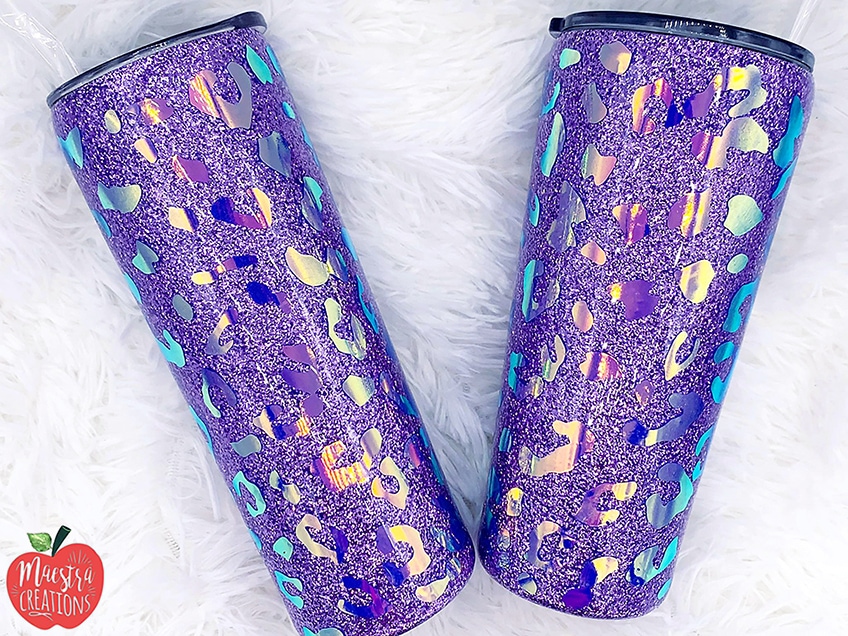
Images: © Ivette Moreno / www.maestracreations.com
Best Resin for Tumblers
Price / Performance recommendation: Pro Marine ProArt Resin
Pro marine ProArt is a high-gloss and clear coat finish, which creates a beautiful and long-lasting effect. ProARt is specially designed for use on creative projects and is easy to use leaving a transparent even finish. It is therefore especially designed to enrich your product and also to protect it from yellowing, just remember that all epoxies will eventually yellow over time.

- Specifically designed for art projects, excellent color stability
- Very easy to use with 1 : 1 mixing ratio, 100% solids, hard-shell finish
- High gloss and crystal clear, your all-seal solution, excellent air release
This resin is perfect for creative projects such as jewelry, woodworks, paintings, tumblers, coasters and much more. Its simple mixing ratio of 1:1 makes it very easy to prepare the topcoat even if you are a novice, but be careful to follow the instructions perfectly. All you need to do is combine one part of Resin with one part of Hardener, stir well and apply to your product. This topcoat produces an even surface and cures fully within 72 hours. The Pro Marine ProArt Resin not have a strong odor, is not flammable and has no fumes or VOC’s.
If you’re thinking of adding color to your resin, the Art Resin has been designed to mix with various types of pigments. You can use any liquid pigment suitable for resin and it will work.
Note: Please take a sample of your resin for testing purposes before you tint it and after tinting, so that when you apply to your final product you are satisfied with the result.
Art N Glow Resin
This type of resin can be used for casting or as a tabletop resin. The main reason this resin is preferred is that when it has dried properly it produces a crystal clear finish. You can also rely on this resin to automatically produce an even surface. The resin also eliminates gas bubbles and is free of odors. Although this resin is odor-free, it is recommended you use it in a well-ventilated space. Art N Glow Resin is also great for beginners, as it is easy to work with and only hardens after 40 minutes. This gives you ample time to complete your project before it dries.

- Epoxy resin for all of your casting AND coating applications
- Cures crystal clear and hard as a rock. Made in the USA
- This resin is self leveling, non-yellowing and odor free
Another reason why Art N Glow resin is popular is that it is UV resistant and as such is ideal for projects that have to stand in the sun. However, it is not recommended you leave your project in the sun for long periods, as it will eventually yellow. Like many other resins, this resin with its easy 1:1 mixing ratio is very user-friendly and perfect for beginners.
You can purchase this resin in 16 ounces (454 grams), 32 ounces (907 grams) or 1 galloon (3753 grams) kits. To obtain better results try to keep your workspace within the temperature range of 72° F (22° C) and 78° F (25° C) allowing the resin to cure properly. Art N Glow Resin can withstand temperatures of up to 120° F (50° C). When handling your resin you can control the temperature and produce a different result. If you find your resin is too cool, then place it into a container of warm water to bring the temperature up slightly. However, be very careful when the resin temperature increases, it will harden much faster and only allow you 30 minutes instead of the standard time of 40 minutes to cure. Reducing bubbling is another benefit of warming your resin.
There is another way to reduce bubbling, pour the hardener slowly down the side of the container you are using for the resin. You need to have a very steady hand when you mix the hardener and resin, try not to add any air bubbles. To assist you with this, you can make use of a blowtorch to remove any air bubbles that may appear while pouring.
Always bear in mind that if you need to pour more than one coat of resin to thicken the finish of your project, always allow 3 to 5 hours between pours. This will ensure you have a crystal clear finish with no tackiness or any other problem. Also, remember after you have waited the 5 hours, you will have to sand down the resin and wipe it clean before you can apply another coat.
Envirotex Lite Epoxy Resin
This particular brand of epoxy resin claims that it is a pour-on resin with a high gloss finish. The product is said to be able to cure with a thick glossy coat in 8 hours at a temperature of 70° F (21° C) and is fully cured in 48 hours.
Tumbler artists love using it because its odour is minimal, as confirmed by the Envirotex’s USA Safety Data Sheet. The resin is also very easy to work with.

- High Gloss 2 component polymer coating
- 1 coat equals up to 50 coats of varnish
- Solvent free formula, heat and alcohol resistant, waterproof
The packaging of the Envirotex Lite Resin also confirms and states “Complies with FDA 21 CFR 175.300 for coatings intended for indirect and direct repeated food contact use when accurately measured, thoroughly mixed, and fully cured”. You need to confirm for yourself that this FDA compliance is correct before you use the product.
By going to the Envirotex Lite website you will find the Safety Data Sheet for the product. The datasheet is very easy to locate and easy to understand and follow. This is very important when handling chemical substances, as the Safety Data Sheet needs to be easy to locate and understand.
Only a few of the resin tumbler artists had a complaint about Envirotex Lite. The product appears to yellow after a certain time when exposed to UV light. Yet all of them still love working with it and will still recommend it to others. In this regard, it is important to note that all resins will yellow over time, but the degree of yellowing and the time it takes to yellow is important.
What Type of Tumbler is Best to use with Epoxy Resin?
The best tumbler to use is a double-walled or insulated tumbler. What is the reason for this choice? Any cured Art Resin can only withstand a maximum temperature of 120° F (50° C). A hot tumbler of tea or coffee will exceed this temperature causing the cured resin to become soft. Therefore, if you plan to make use of your tumbler for hot beverages, an insulated or double-walled tumbler is ideal as it keeps the outside of the tumbler cool. You should also consider a tumbler that as a plastic lip, this keeps the hot beverage from coming into contact with the resin.
Here are some of the more popular tumbler materials that you can use:
Metal Tumblers
When using a metal tumbler, Stainless Steel is the best bet for applying resin to your tumbler. The Epoxy Resin adheres better to the Stainless Steel than any other metal and it does not need a coat of paint. However, if you want to complement your colour you can always apply a base coat of paint.
Note: If you plan to use your tumbler for hot drinks ensure that you choose an insulated tumbler, as this will protect the resin from getting hot and softening.
Plastic Tumblers
Try to avoid making use of plastic tumblers for your project, as the Epoxy Resin does not stick to the plastic and after time will peel off. If you use a tumbler that has a small spot of plastic on it, try to cover the spot with paint that is compatible with plastic. This will allow the resin to adhere to the tumbler.
Glass or Ceramic Tumblers
Make sure if you use epoxy for cups made of glass or ceramic, you only use them for cold beverages, as the glass or ceramic tumblers will absorb heat from your hot beverages. This will then cause the resin to soften. A glass or ceramic tumbler is acceptable only if the interior of the tumbler is glass with a stainless steel exterior.
Tutorial for how to make an Epoxy Tumbler
Get your tumbler and work surface prepared
Line your work surface with a drop sheet, this will catch all the resin that drips off. Put your cup turner onto the work surface. Apply tape to the tumblers plastic lip and if necessary also tape the base. If you require a different colour for your tumbler, now is the time to spray paint your desired colour. Take the spit rods pointed end and insert it into the small foam football. Now, insert the football into the tumbler and ensure that it reaches to the bottom. Fix the one end of the spit rod to the motor and the other resting on the bracket. Using a level ensure that the rod is perfectly horizontal. Use some tape to protect the spit rod from drops of resin.
Preparing your Resin
When working with ArtResin, always make sure you are wearing gloves and follow the instructions for preparation. Always measure the mix precisely and properly. You can use a shot glass to measure off your color tint, one for each color. Split up your already prepared ArtResin between cups. Put in the tint and mix, making sure to do this thoroughly.
When mixing the tint, you can start by only adding a small amount. You can then add more if you think it is needed. Take note that ResinTint provides intense color and you only need a small amount which will go a long way.
When you add up the total volume of hardener and resin, you should never add more than 6% tint color to the total mixture. The resin might not cure properly if you use more.
Applying the Resin
Turn the rotisserie on, you will notice the cup starting to turn. Slowly and carefully pour your tinted resin over the tumbler. You can either use a gloved finger or a popsicle stick to spread the mixture over the tumbler. Take your other tinted resin mixtures and follow the same process. For added effect, you can also drizzle a small amount of white after each color, this will produce a marbled effect.
Allowing the Tumbler to cure
Keep the rotisserie turning until the resin mixture is dry. This should take about 18 to 24 hours. You can then remove the tumbler from the rotisserie, also remove the tape from the lip. Allow the tumbler to cure for a further 72 hours.
If you notice some tape left behind on the tumbler, simply use some vegetable oil or other adhesive remover to get rid of it. Maybe a little RsinArt snuck in underneath the tape? If this is the case, take some acetone or rubbing alcohol and remove it. The resin may have already cured and become hard. In this case, take some sandpaper or a knife to get the access off. If you do sand it off, you can remove the dust with a damp cloth. Once completed, first wash the tumbler properly before you use it.
How to make your own Glitter Tumbler
Thinking of using acrylic glitter paint first? Use a paintbrush to apply the paint to your tumbler and let it dry. For loose glitter, first, spray the tumbler with adhesive and then sprinkle glitter over the surface. Make sure you do this over some paper, so as not to make a mess everywhere. You can also roll the tumbler in the glitter. Allow to completely dry.
Remember to paint the tumbler with a base color similar to the glitter you are using. When using epoxy, you do not need to apply a lot, or it might get areas or spots where the hue of the glitter is different. The epoxy brings out the glitter and doesn’t cover it up, so here is a general amount you will need to cover your tumbler.
Applying the Resin
Make sure the coat of glitter is completely dry before mounting your tumbler onto a cup turner or rotisserie. Put on your gloves and measure out your ArtResin and mix thoroughly. Switch on the rotisserie and carefully pour the ArtResin over the tumbler. You can smooth the mixture over the surface with your gloved finger. Cover the entire surface evenly. Keep the rotisserie turning until it dries, which should take about 18 to 24 hours. When it is dry, you can remove it from the rotisserie, also remove any tape and allow it to cure fully for a further 72 hours.
How to properly handle your Epoxy Tumbler
When the epoxy has completely cured, the next step is cleaning it. Remember to always check your tumbler on the inside!
First, clean the rim of the epoxy cup or tumbler by using an Exacto Knife. Use a torch to heat the blade so that it glides across the surface.
This is IMPORTANT! If the blade is not hot enough and it does not glide across the surface, it can break the seal between the epoxy and cup. If this happens, the cup is not safe to use, because moisture can then get in and the epoxy will eventually peel off and mold can grow in between the surfaces.
Once the epoxy has been trimmed all around, make sure the bottom of the tumbler is even, otherwise, it won’t be stable when standing. If you find it uneven, this may be due to the fact you turned the rotisserie off too soon, so the epoxy congealed at the bottom. Another reason would be if the cup was not level when turning in the first place.
You should only use alcohol when cleaning the inside of the tumbler, which will remove any paint residue. Ensure everything is glossy and then clean with some soap and water. Finally, allow to dry.
- Only expose your epoxy cups to a maximum temperature of 50° C or 120° F. Therefore, hand wash all epoxy cups in soap, warm water. Do not leave your tumbler in your car which is in the sun. Only use your tumbler for cold drinks, unless it is double insulated.
- Make sure that your tumbler has cured completely before using.
- Remove all traces of any epoxy that is left on the lip of the tumbler. You can use some sandpaper or a knife to get rid off the excess resin that slipped through the tape over the lip. If you use sandpaper, you can remove the dust with a damp cloth. Finally, wash the tumbler in warm soapy water before using.
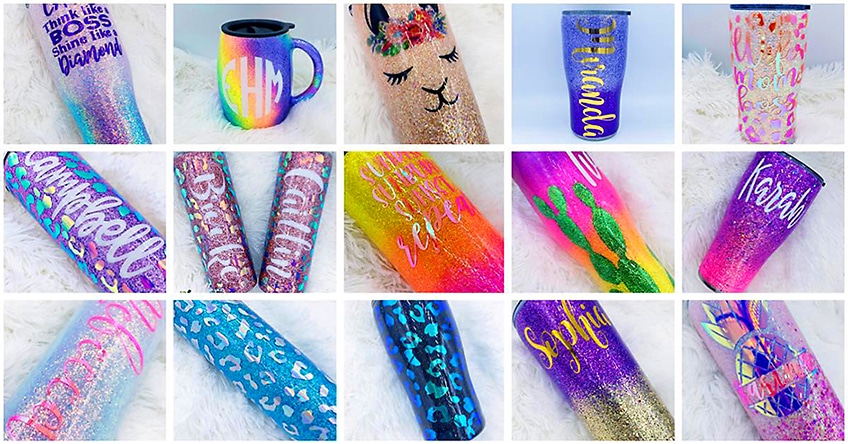
Images: © Ivette Moreno / www.maestracreations.com
