Epoxy Concrete Floor – DIY Epoxy Floor Coatings [Instruction]
This post may contain affiliate links. We may earn a small commission from purchases made through them, at no additional cost to you. You help to support resin-expert.com
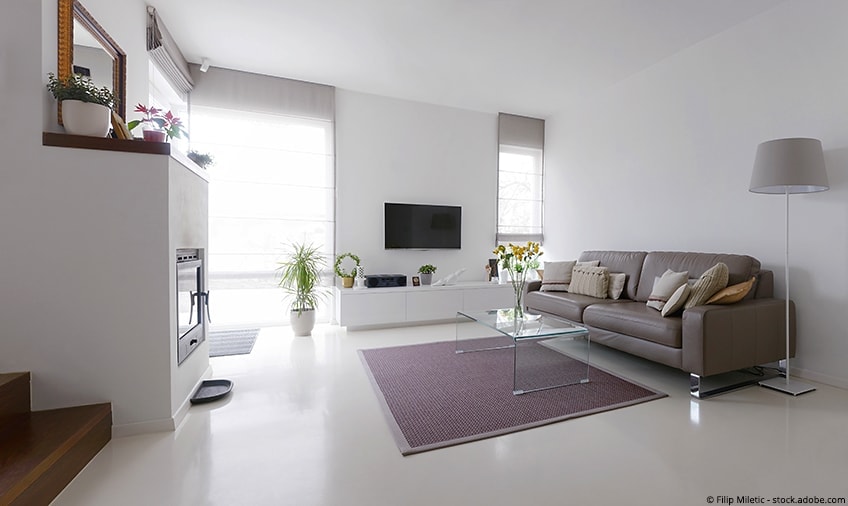
The epoxy resin floor is trendy, noble and timeless at the same time and particularly durable. This is just to name a few of the advantages that speak for a synthetic resin floor. In this article with integrated instructions, you will learn in detail how you can make an epoxy resin floor coating for your living space itself.
Table of Contents
What aspects speak for a synthetic resin floor?
Due to its multitude of positive properties, there is now probably no other material used in such a wide range, as the epoxy resin. Beginning with the shower in the home, to a coating of three-dimensional components of terrariums, to the sealing of industrial floors, the use of epoxy resin unanimously enjoys steadily increasing popularity. Epoxy resin is also being used more and more frequently for floors in the sports sector due to its positive properties.
Positive properties of a floor coating using epoxy resin at a glance
.
-
- Increased hardness and abrasion resistance
.
-
- Insensitivity to impact
- Low tendency to crack
- Resistance to acids, chlorinated hydrocarbons, alcohol, gasoline and mineral oil
.
-
- Resistance to weathering
- Good suitability for electrical insulation as well as tracking resistance
.
-
- Eliminated final flammability of the epoxy resin
.
-
- Exceptionally low shrinkage during the drying phase
.
-
- Increased degree of accuracy of dimensions
.
-
- Increased degree of strength of adhesion
.
-
- Resistance to UV radiation when a special clear coating is applied
.
-
- Exceptionally high resistance to heat molding
.
-
- Optimal thermal properties are in some cases up to 250 degrees Celsius
.
-
- Increased tightness of about 1.20 grams per cubic centimeter
.
Note: But since the lion’s share of these positive properties can only be ensured with the complete curing of the floor coating, when using epoxy compound is to pay particular attention to the meticulous observance of the specified drying and curing phase.
.
To further enhance the positive properties, there are numerous options. For example, glass fiber fabric can be embedded in the liquid resin to further increase the strength level of the dried and fully cured epoxy. At best, this gives the epoxy resin of the floor coating a strength similar to that of steel. In comparison, however, the epoxy resin has a much lower weight and, in particular, is absolutely free from any kind of corrosion.
Application for different floors
.
The following applications are suitable for floor coating with epoxy resin:
-
- Precious synthetic resin living room floors with concrete effect, matte or mirror finish result in countless design possibilities
.
-
- Kitchens also benefit from the resistance of the two-component system
.
-
- Bathroom floors are ideal due to the resistance and water resistance
.
-
- Shower trays, which must be waterproof, can also be created with epoxy
.
-
- In the conservatory, epoxy floors are also very suitable and easy to maintain
.
-
- Basement floors can be either painted with an epoxy paint, but also poured
.
Challenges associated with epoxy floor coatings – These points you should consider
.
Despite all the positive aspects, the application of epoxy resin is also associated with negative characteristics. In comparison, however, the extent of negative aspects is kept quite short.
-
- No complete lightfastness
.
-
- Resistance to highly concentrated acids is not guaranteed, but this is negligible in residential applications
.
-
- Evoking skin rashes and inflammation in the liquid state during processing
.
Material needed for a floor coating of 2k epoxy
For floor coating there are special products, which were developed for this application.
Repairing damaged areas
Damaged areas should be repaired beforehand, so that the substrate is leveled. For this purpose, they optimally use a special repair mortar.
2. Primer for the synthetic resin floor
For almost all substrates, you should first apply a primer. This will prevent the applied epoxy from sinking into absorbent substrates and leaving an uneven surface.
3. The suitable epoxy resin for floor coating
The right product for the actual coating of the floor is important for a successful project. Be sure to use specially developed products, which are designed for this application. They are available either as already colored, but also as colorless containers, and the quality is very important.
4. Color paste, deco flakes and glass granules
A suitable color should be used for coloring the resin. Additional colored accents can be achieved with deco flakes, which are sprinkled into the still-wet Hars. Glass granules are particularly suitable for making the substrate non-slip.
5. Tools and aids
Applying epoxy works best with a coating roller.
For the application of epoxy resin, a special deaeration roller is necessary, which removes contained air bubbles when passing over it and ensures the final fine distribution.
To mix the two components, you will need a drill with a stirring attachment to mix both components thoroughly for several minutes at a speed of about 400 per minute
6. Work safety
When working with epoxy resin, you should follow some safety measures for your health. For example, wearing nitrile gloves as well as safety glasses is one of the absolute basics. For protection against escaping vapors, you should also wear a respirator with gas filter.
Preparations for floor coatings using epoxy resin
Generally, the more carefully the preparatory measures are carried out, the better the result of your floor coating will be afterwards..
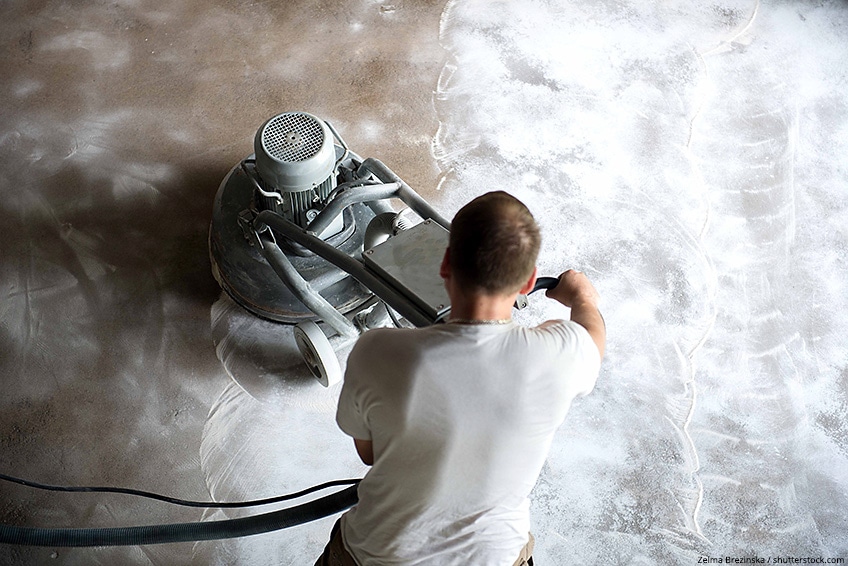
At the beginning of your coating work, the current condition of your floor must be analyzed. If this already cracks and grooves in its structure, it is recommended to fill and thoroughly close them in advance with the help of a fine filler. The sealing is done by means of a special filler, which is available in almost any hardware store. Ideally, after the complete drying and hardening of the filler still the sanding of your floor.
In addition, it is advisable to apply a special primer before the actual floor coating with epoxy resin. This is designed to strip the floor of its absorbency and ensure that the paint cannot seep through the floor. Consequently, you can keep the paint consumption low.
Tip: Both for the epoxy primer and for the coating compound itself, a drill or an electric mixer with a speed of 300 to 400 rpm is required to mix the components. It is also advisable to use products from the same manufacturer to ensure that they are fully compatible with each other.
Step-by-step instructions floor of epoxy resin in the home
Step 1: Mixing from the resin – These points are essential to note
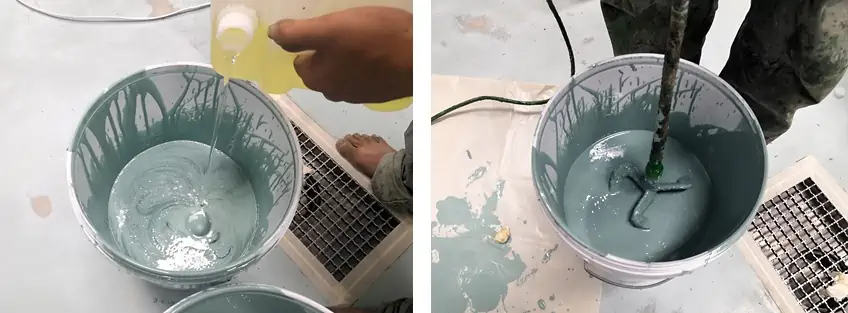
One of the most essential aspects of processing epoxy resin with two components is to comply with the recommended mixing ratio of resin and hardener. In this regard, care must be taken to work according to the manufacturer’s instructions in order to avoid any form of deviation.
The required mixing ratio can be specified by manufacturers either as a percentage or as a ratio. Almost any form is conceivable, from 1.5 percent to a mixing ratio of 1:1. If too little hardener is added to the epoxy resin, a possible inconsistency could be, for example, that the floor coating does not cure completely. Otherwise, too much hardener can cause the floor to become brittle and porous. Many manufacturers already offer delivery of the correct dosage. This provides an optimal way to avoid emerging problems due to an incorrect mixing ratio.
 Images: Chinnabanchon9Job / shutterstock.com
As previously mentioned, it is essential to pay attention to compliance with the product range. Consequently, under no circumstances should two products from different manufacturers be mixed with each other. Even if the specified mixing ratio for one of the two products is applicable, this is almost certainly not true vice versa for the other product. If compliance with the product range is disregarded, a not complete curing of the epoxy resin mixture can also occur here. In addition to consistency, the color of the finished product may likewise show weaknesses. At best, the result of the floor coating will be only milky and cloudy, at worst, there may be uneven yellowish or even bluish discoloration of the epoxy resin.
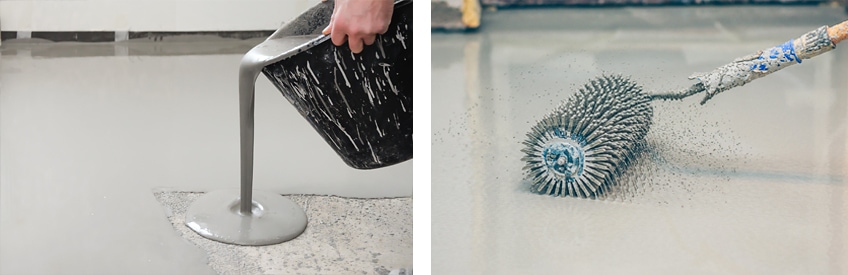
To mix the epoxy resin coating for your floor, first add the colored resin as the so-called base component to a separate container and stir briefly. Subsequently, the hardener of the same product range is added to the same container in the specified ratio. To mix both components, use a drill or an electric stirrer with the recommended speed of 300 to 400 rpm.
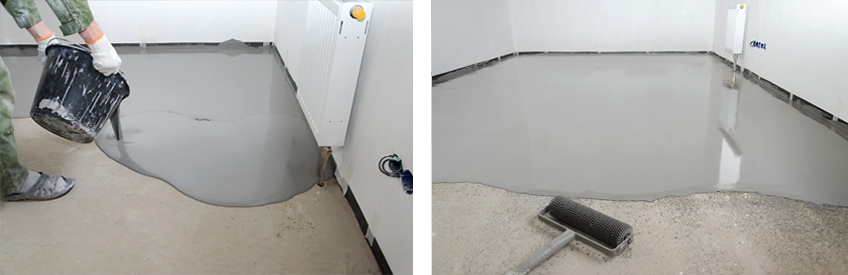
Step 2:Application of each epoxy coating to the floor
The application procedure of the finished mixture of epoxy resin mass is similar to the procedure for painting walls and is also done by means of a roller. For this reason, this type of coating is also called a roller coating. For careful application of the epoxy resin mixture, it is essential to ensure that the roller used is free of lint and dust. Similar to the wall coating, the application of two layers is also recommended here for optimum opacity. Between the application procedure of both layers, a drying and curing time of at least 24 hours must be observed.
Images: Salamatik / andrey gonchar – stock.adobe.com
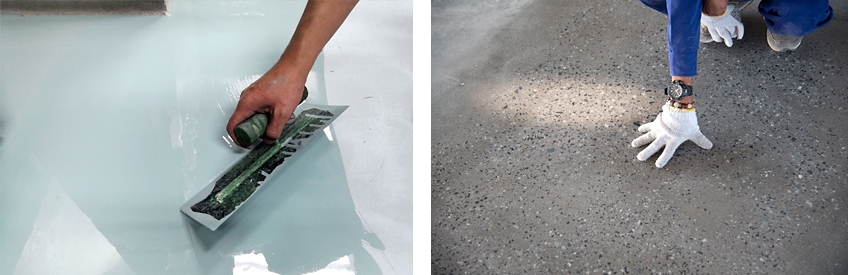
Step 3:Scattering decorative elements such as stones, flakes or chips into the epoxy
With the help of decorative stone elements, great patterns can be integrated into the floor coating by means of epoxy resin.In this method, stones in different colors or grain sizes are simply drawn partially into a grid. This grid is then pulled out of the coating again in time before the drying and curing phase is complete.
For appropriate artwork in your floor coating, however, you should seek the advice of a professional to avoid inconsistencies. Inexperienced do-it-yourselfers often lack the necessary sensitivity to pull the grid back out of the floor coating at the right time.
Otherwise, due to a lack of experience, the two colors may not bond completely. This sometimes results in gaps through which moisture can later penetrate under the floor coating. Another risk is the possible formation of unevenness on the surface. These occur when the stone mass has already set in the coating.
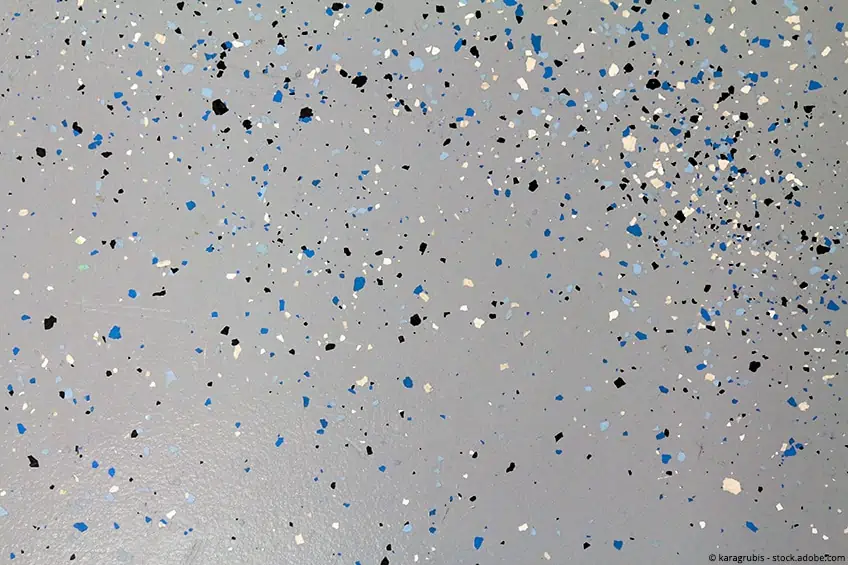
Another option for a special contrast is offered by colored deco chips. These are simply sprinkled into the damp epoxy resin mass immediately after the application of the last coating. The deco chips then immerse in the resin, so that finally only the upper edge remains on the surface of the floor coating.
In order not to leave footprints in the not yet cured coating, it is necessary to use special nail shoes.
If a monochromatic but non-slip floor coating is desired, the use of glass beads is applied. These are comparable to the consistency of fine grains of salt and, like the decorative chips, are sprinkled into the damp epoxy resin mass immediately after application of the last coating.
However, since these are only immersed halfway into the resin, a special slip resistance of the floor coating is achieved. The amount of interspersed glass beads used has an influence on the corresponding degree of slip resistance.
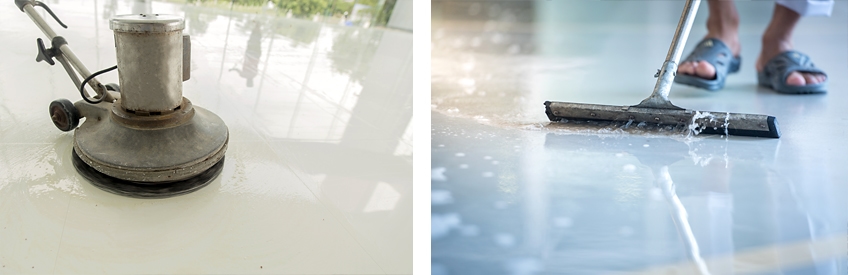
Step 4: Sealing the synthetic resin floor
After complete drying and curing, the epoxy resin has an unusually high durability. However, this type of floor coating is not completely resistant to light. Consequently, yellowing may occur, should not be applied a special clear coat.
Even coloring with the help of special tinting colors or color pigments can not ensure complete lightfastness of the floor coating. To achieve both light resistance and an optimal gloss, a subsequent sealing of the floor coating is recommended..
In this case, another layer of a transparent epoxy resin is applied. This can again increase the stability of the floor, which provides additional resistance to scratches and other influences such as fireplace sparks. The weather resistance of the floor coating is also strengthened once again. The resulting gloss of the transparent epoxy resin rounds off the benefits of the application.
Images: Chinnabanchon9Job, Bannafarsai_Stock / shutterstock.com
Step 5: Complete compliance with the drying and curing phase
Due to the fact that compliance with the drying and curing phase has a significant impact on the result when coating using epoxy resin, the corresponding time period should be explicitly highlighted again. Depending on the manufacturer, a drying time of up to 24 hours per layer is required.
This is followed by the curing phase of the floor coating. A period of up to 7 days may be required before the resin really reaches its full load-bearing capacity. For detailed information on drying and curing times, please refer to the relevant manufacturer’s instructions.
Step 6: Care and cleaning of the finished floor coating with epoxy resin
Through use, over time, there will inevitably be signs of wear, wear and possible discoloration of the floor coatings. Especially dirt in granular consistency has an increased abrasive effect on the coating surface and can cause irreparable damage.
Both for hygienic reasons as well as for substance-preserving reasons, each floor coating requires special cleaning and care.In the context of the construction phase, the floor should be protected from damage with the help of an appropriate cover. In addition, accompanying the construction phase, regular cleaning is recommended to carefully remove sand, dust and similar contaminants.
 Images: Bannafarsai_Stock, BELL KA PANG / shutterstock.com
After completion of the construction phase, the main thing is to avoid white fracture due to sharp mechanical stress on the floor coating. This can be counteracted, for example, by special felt glides on chair legs or soft casters on chairs and cabinets.
In general, when coating floors with epoxy resin, it should be noted that lighter shades require more cleaning.
Particularly in the case of coatings with a high decorative appeal, it is evident that around 85 percent of the soiling enters the interior via footwear. This soiling can be effectively counteracted by the special application of so-called clean run zones.
This not only reduces the cost of cleaning, but also preserves the appearance of the floor coating and extends its service life. While in the outdoor area above all grates have proven themselves as clean run zones in front of the front door, in the interior of the entrance area primarily textile runners or mats are used.
